
Tutorials
How to run a tree test
See whether people can find what they need in any structure, from a website menu to an app or a help centre, and where they get lost and why: tree testing, now with synthetic users.
What a tree test is, and when to use it
A tree test asks people to find things in a text-only version of your structure, one task at a time: a website menu, an app's navigation, a help centre, a product catalogue or any other hierarchy. It shows which tasks people complete, where they start, where they get lost and what they were thinking. Use it to check a structure before you build it, whether it came from a card sort or is the one you already have.
The screenshots follow a made-up UK energy supplier, Kestrel Energy, testing the menu it has today. Every screenshot is numbered, and the list under it says what each number points to.
Set it up
- Click Create Study and pick Tree testing, under Evaluate.
- Build your tree in the Tree section, or bring in the menu you have with Import / Paste. Coming from a card sort, Create Tree Test with this IA builds it for you.
- Write the tasks, up to 20, each as something a person comes to do.
- Pick each task's correct answers, or none for an exploratory task.
- Choose an audience and set the number of participants. Up to 20, any audience works; 50 to 300 needs one built in the Audience Crafter.
- Check the settings.
- Generate the participants, then click Run Tree Test.
A study takes up to 20 participants, or 50 to 300 where large studies are on for your account.
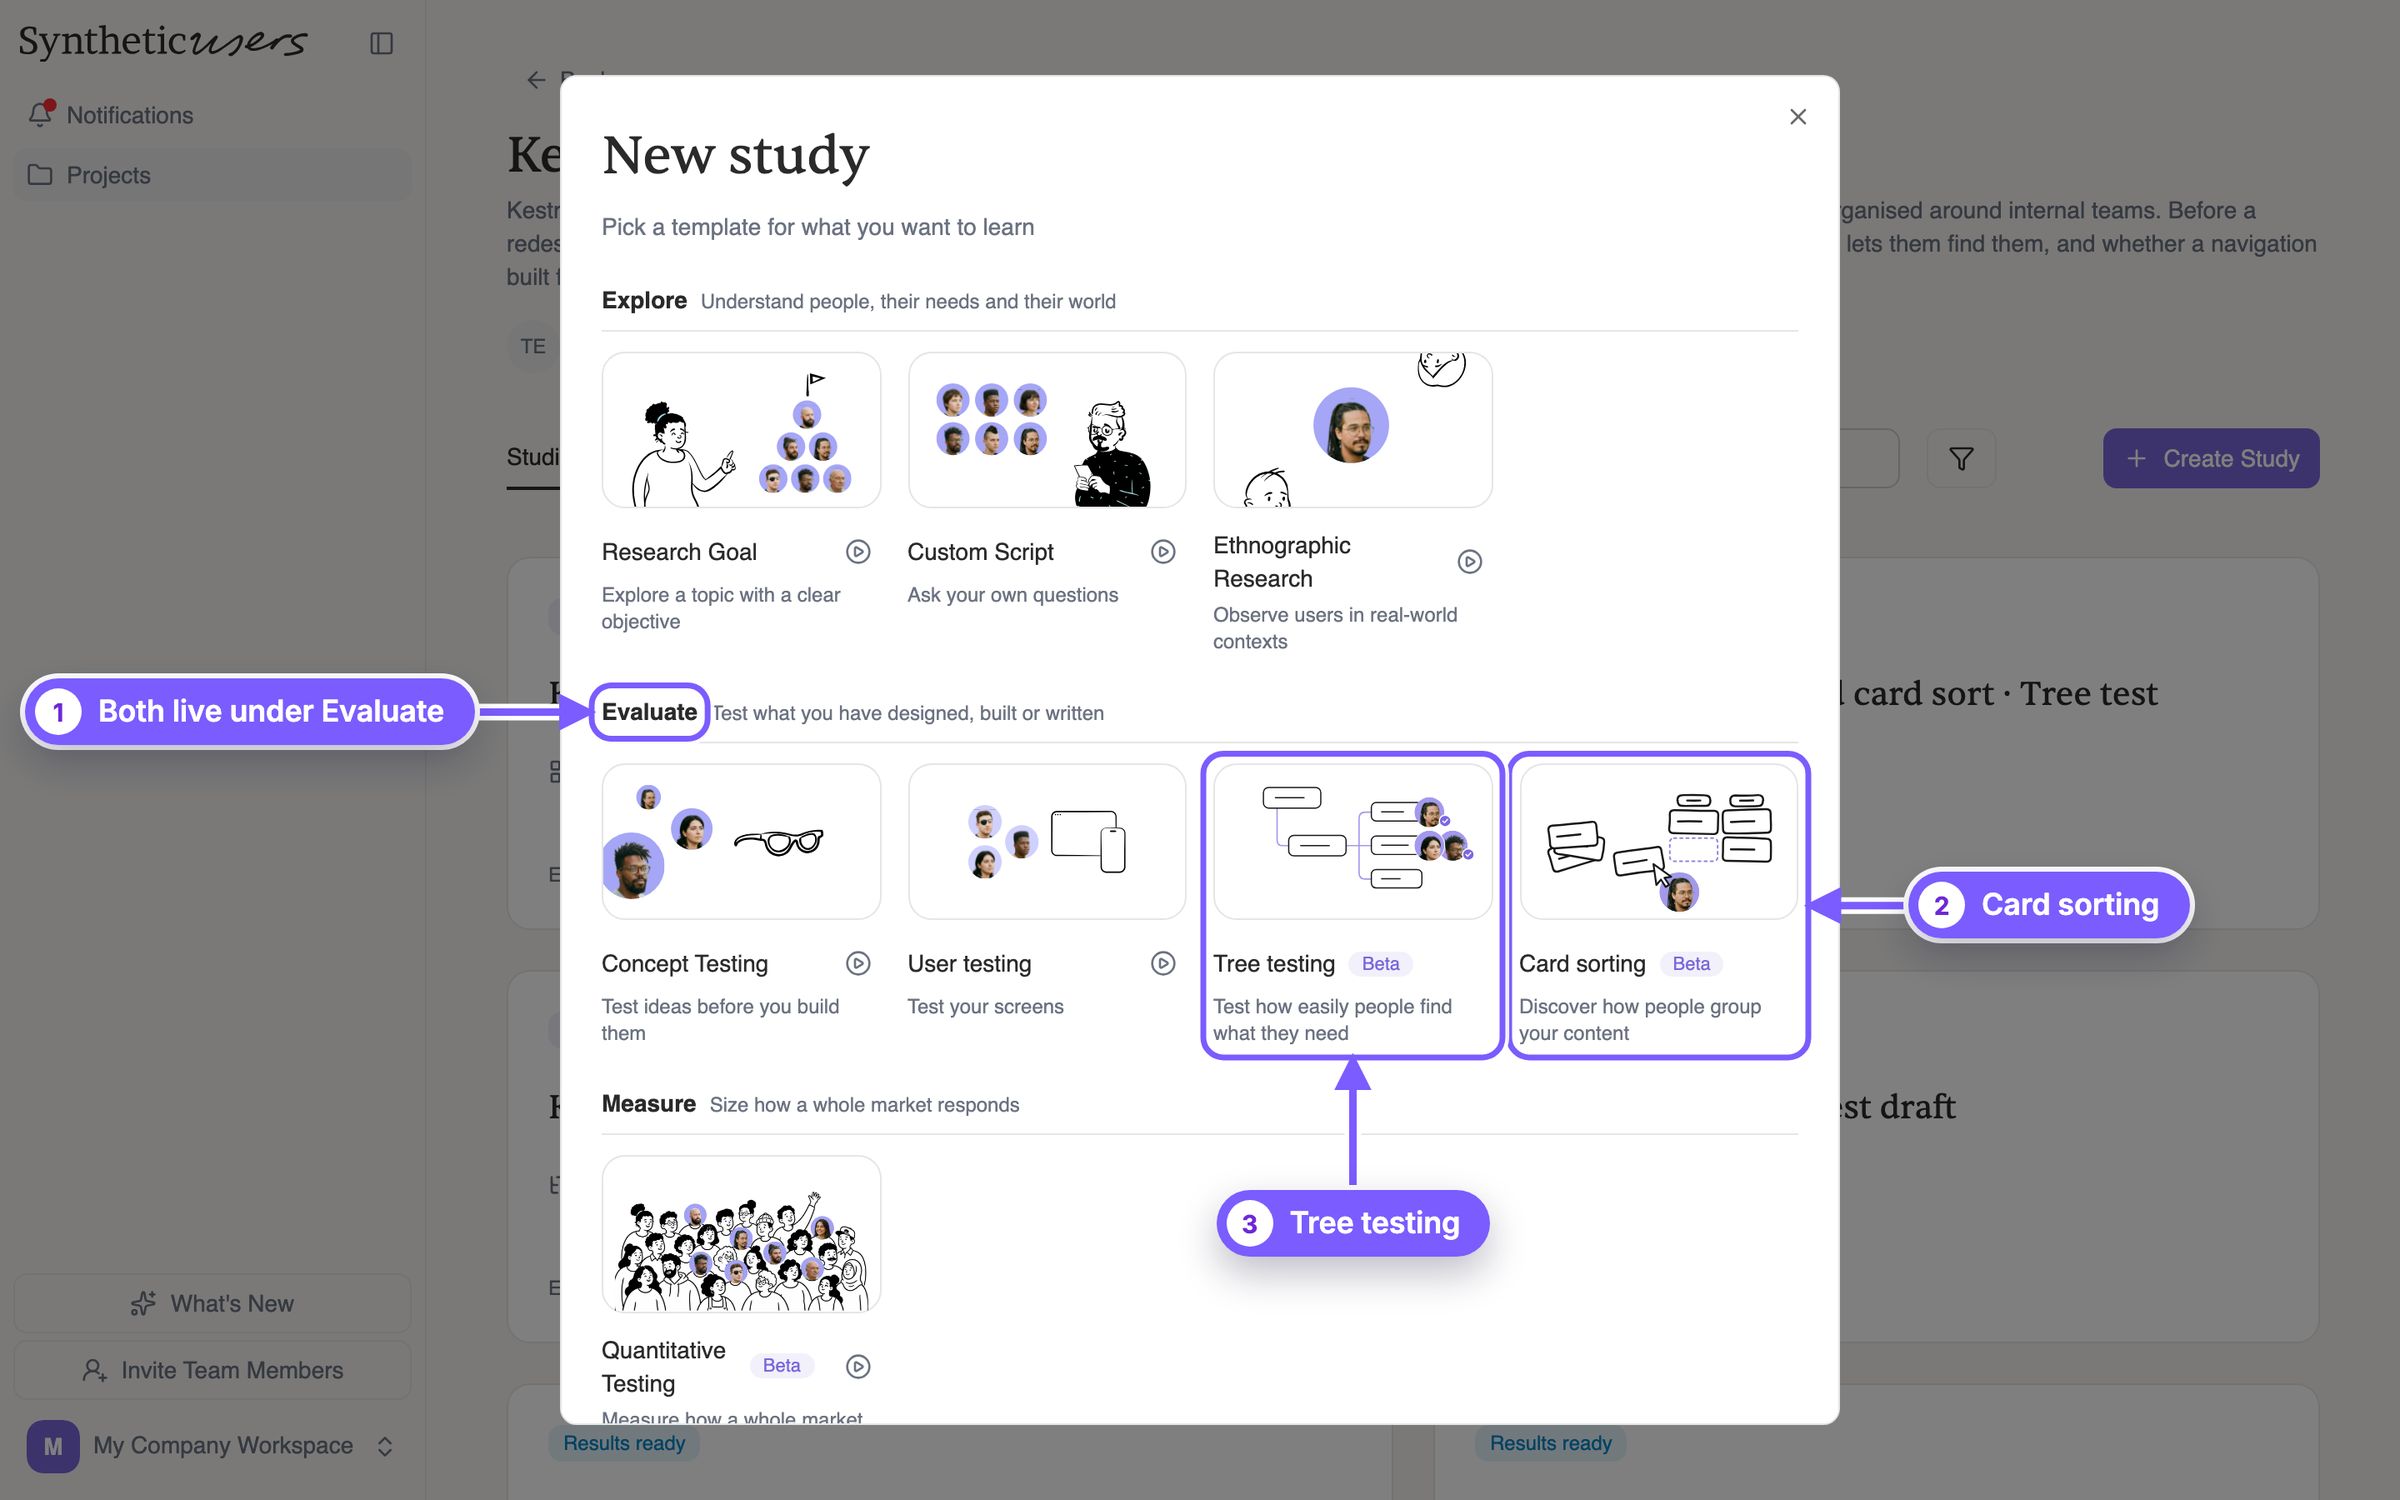
- 1Both live under Evaluate. Evaluate holds the templates that test something you have designed, built or written. Card sorting and Tree testing are both there, in beta.
- 2Card sorting. Shows how people group your content. Use it when you're deciding how to organise things, or checking whether your categories make sense.
- 3Tree testing. Shows whether people can find things in a structure. Run it on the structure from a card sort, or on a menu you already have.
Build the tree in the Tree section. Each box is one item of the menu, and its indent sets its level.
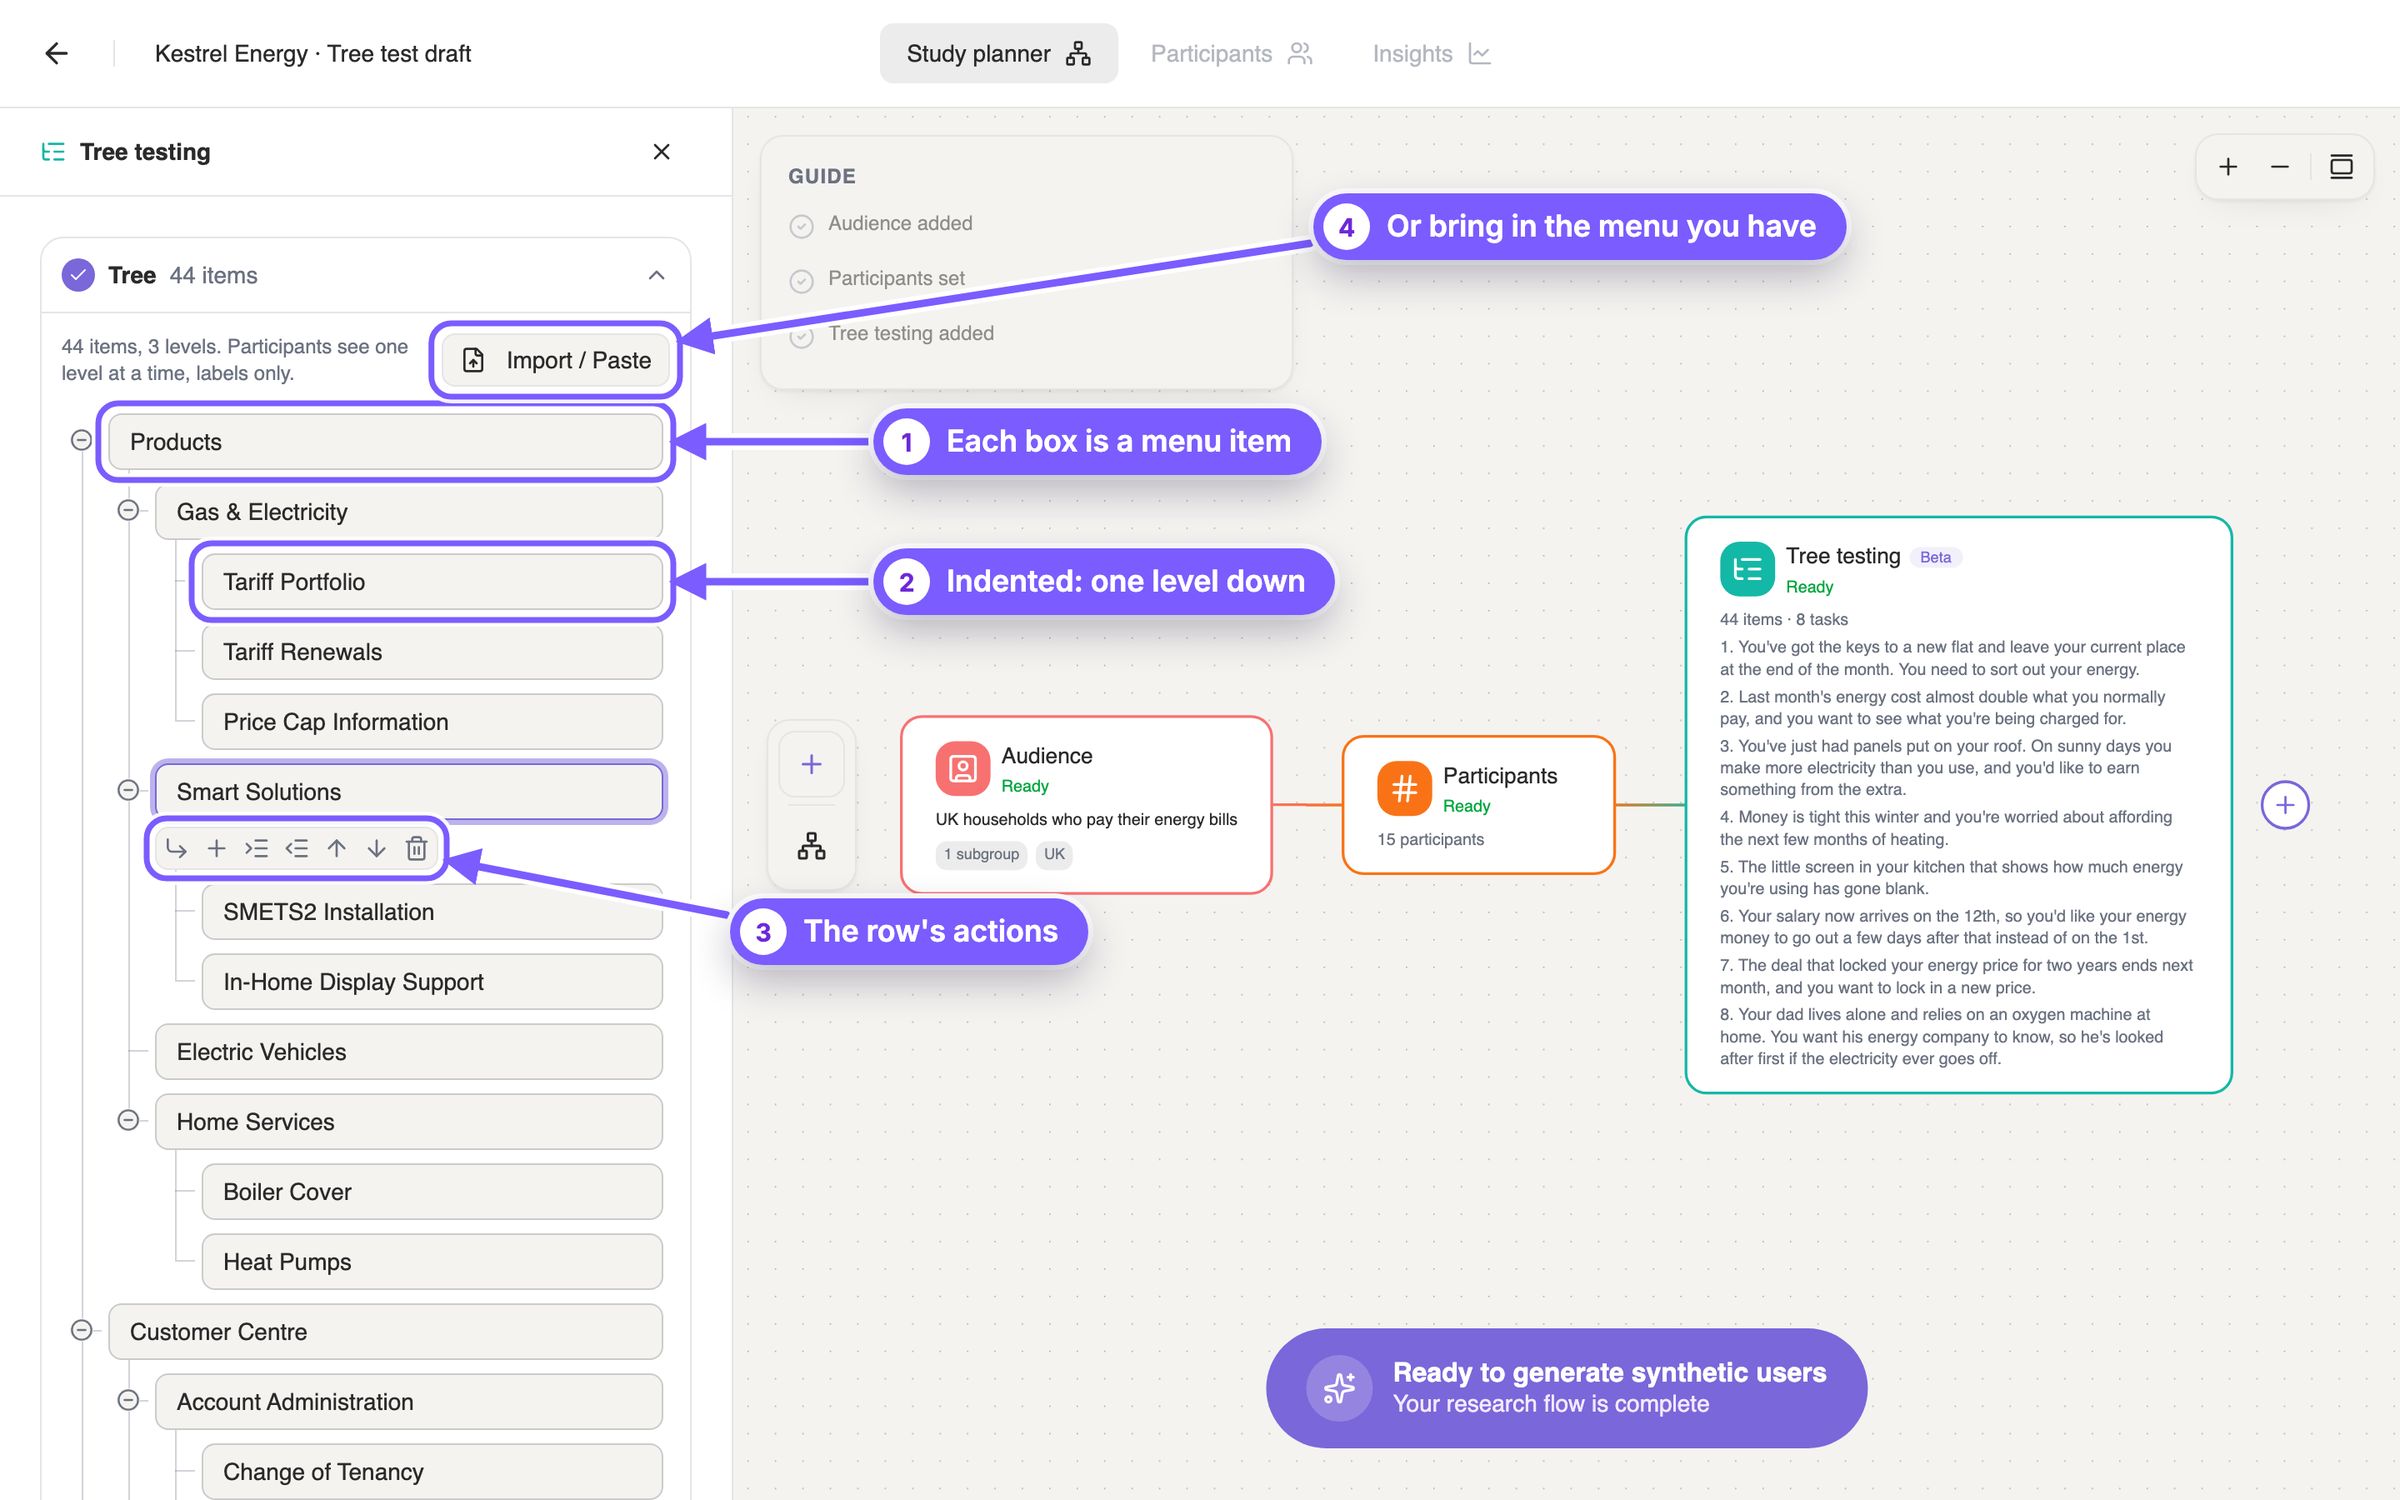
- 1Each box is a menu item. Click a box to type or rename an item. Participants see exactly these labels, as plain text.
- 2Indented: one level down. An item indented under another sits inside it: participants open the item above to reach it. The circles on the lines collapse or expand a branch.
- 3The row's actions. The row you're on shows its actions: add an item inside it or below it, move it in, out, up or down, or delete it. Or use the keys: Enter adds an item below, Tab moves it in a level, Shift+Tab moves it out, Alt+↑ and Alt+↓ move it up or down.
- 4Or bring in the menu you have. Import / Paste adds a whole tree at once, from pasted text or a file (next screenshot).
To bring in a menu you already have, use Import / Paste.
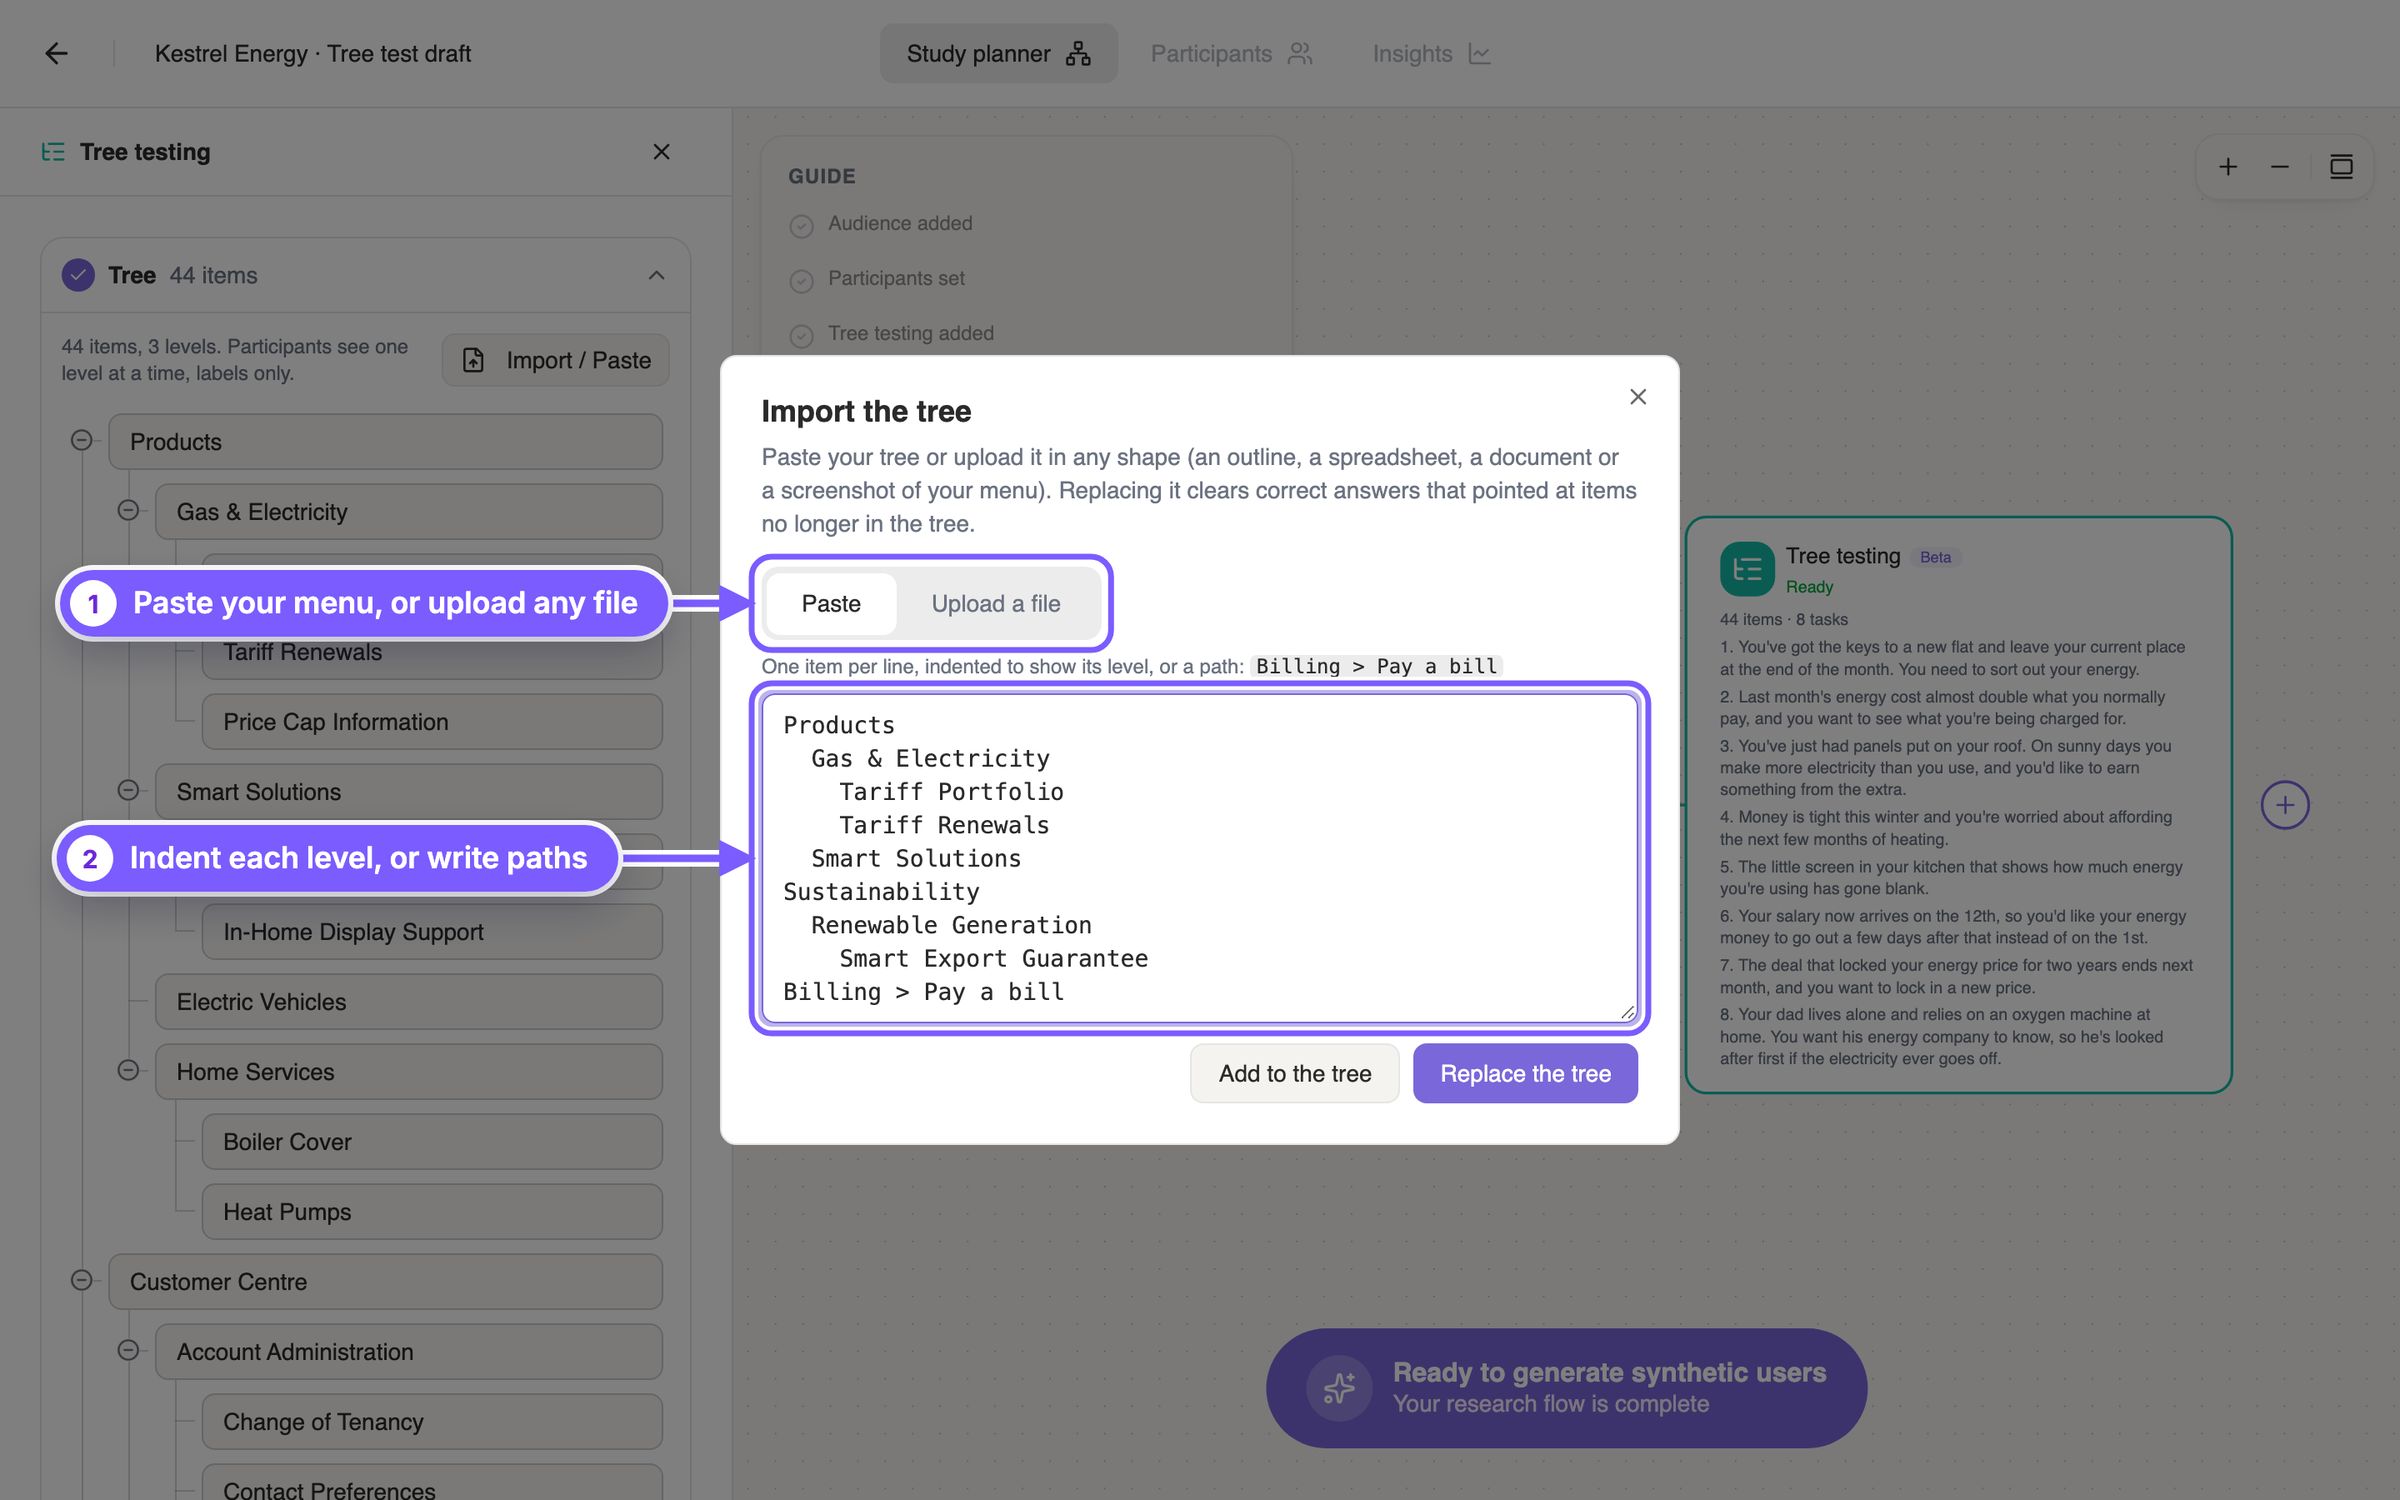
- 1Paste your menu, or upload any file. Paste takes text copied from anywhere. Upload a file reads the tree out of a spreadsheet, a document or a screenshot of your menu.
- 2Indent each level, or write paths. One item per line. Indent a line to put it under the one above, or write a path such as Billing > Pay a bill. Replace the tree clears correct answers that point at items it no longer has.
Coming from a card sort, Create Tree Test with this IA opens a draft whose tree is the sort's sections, with the same audience and number of participants.
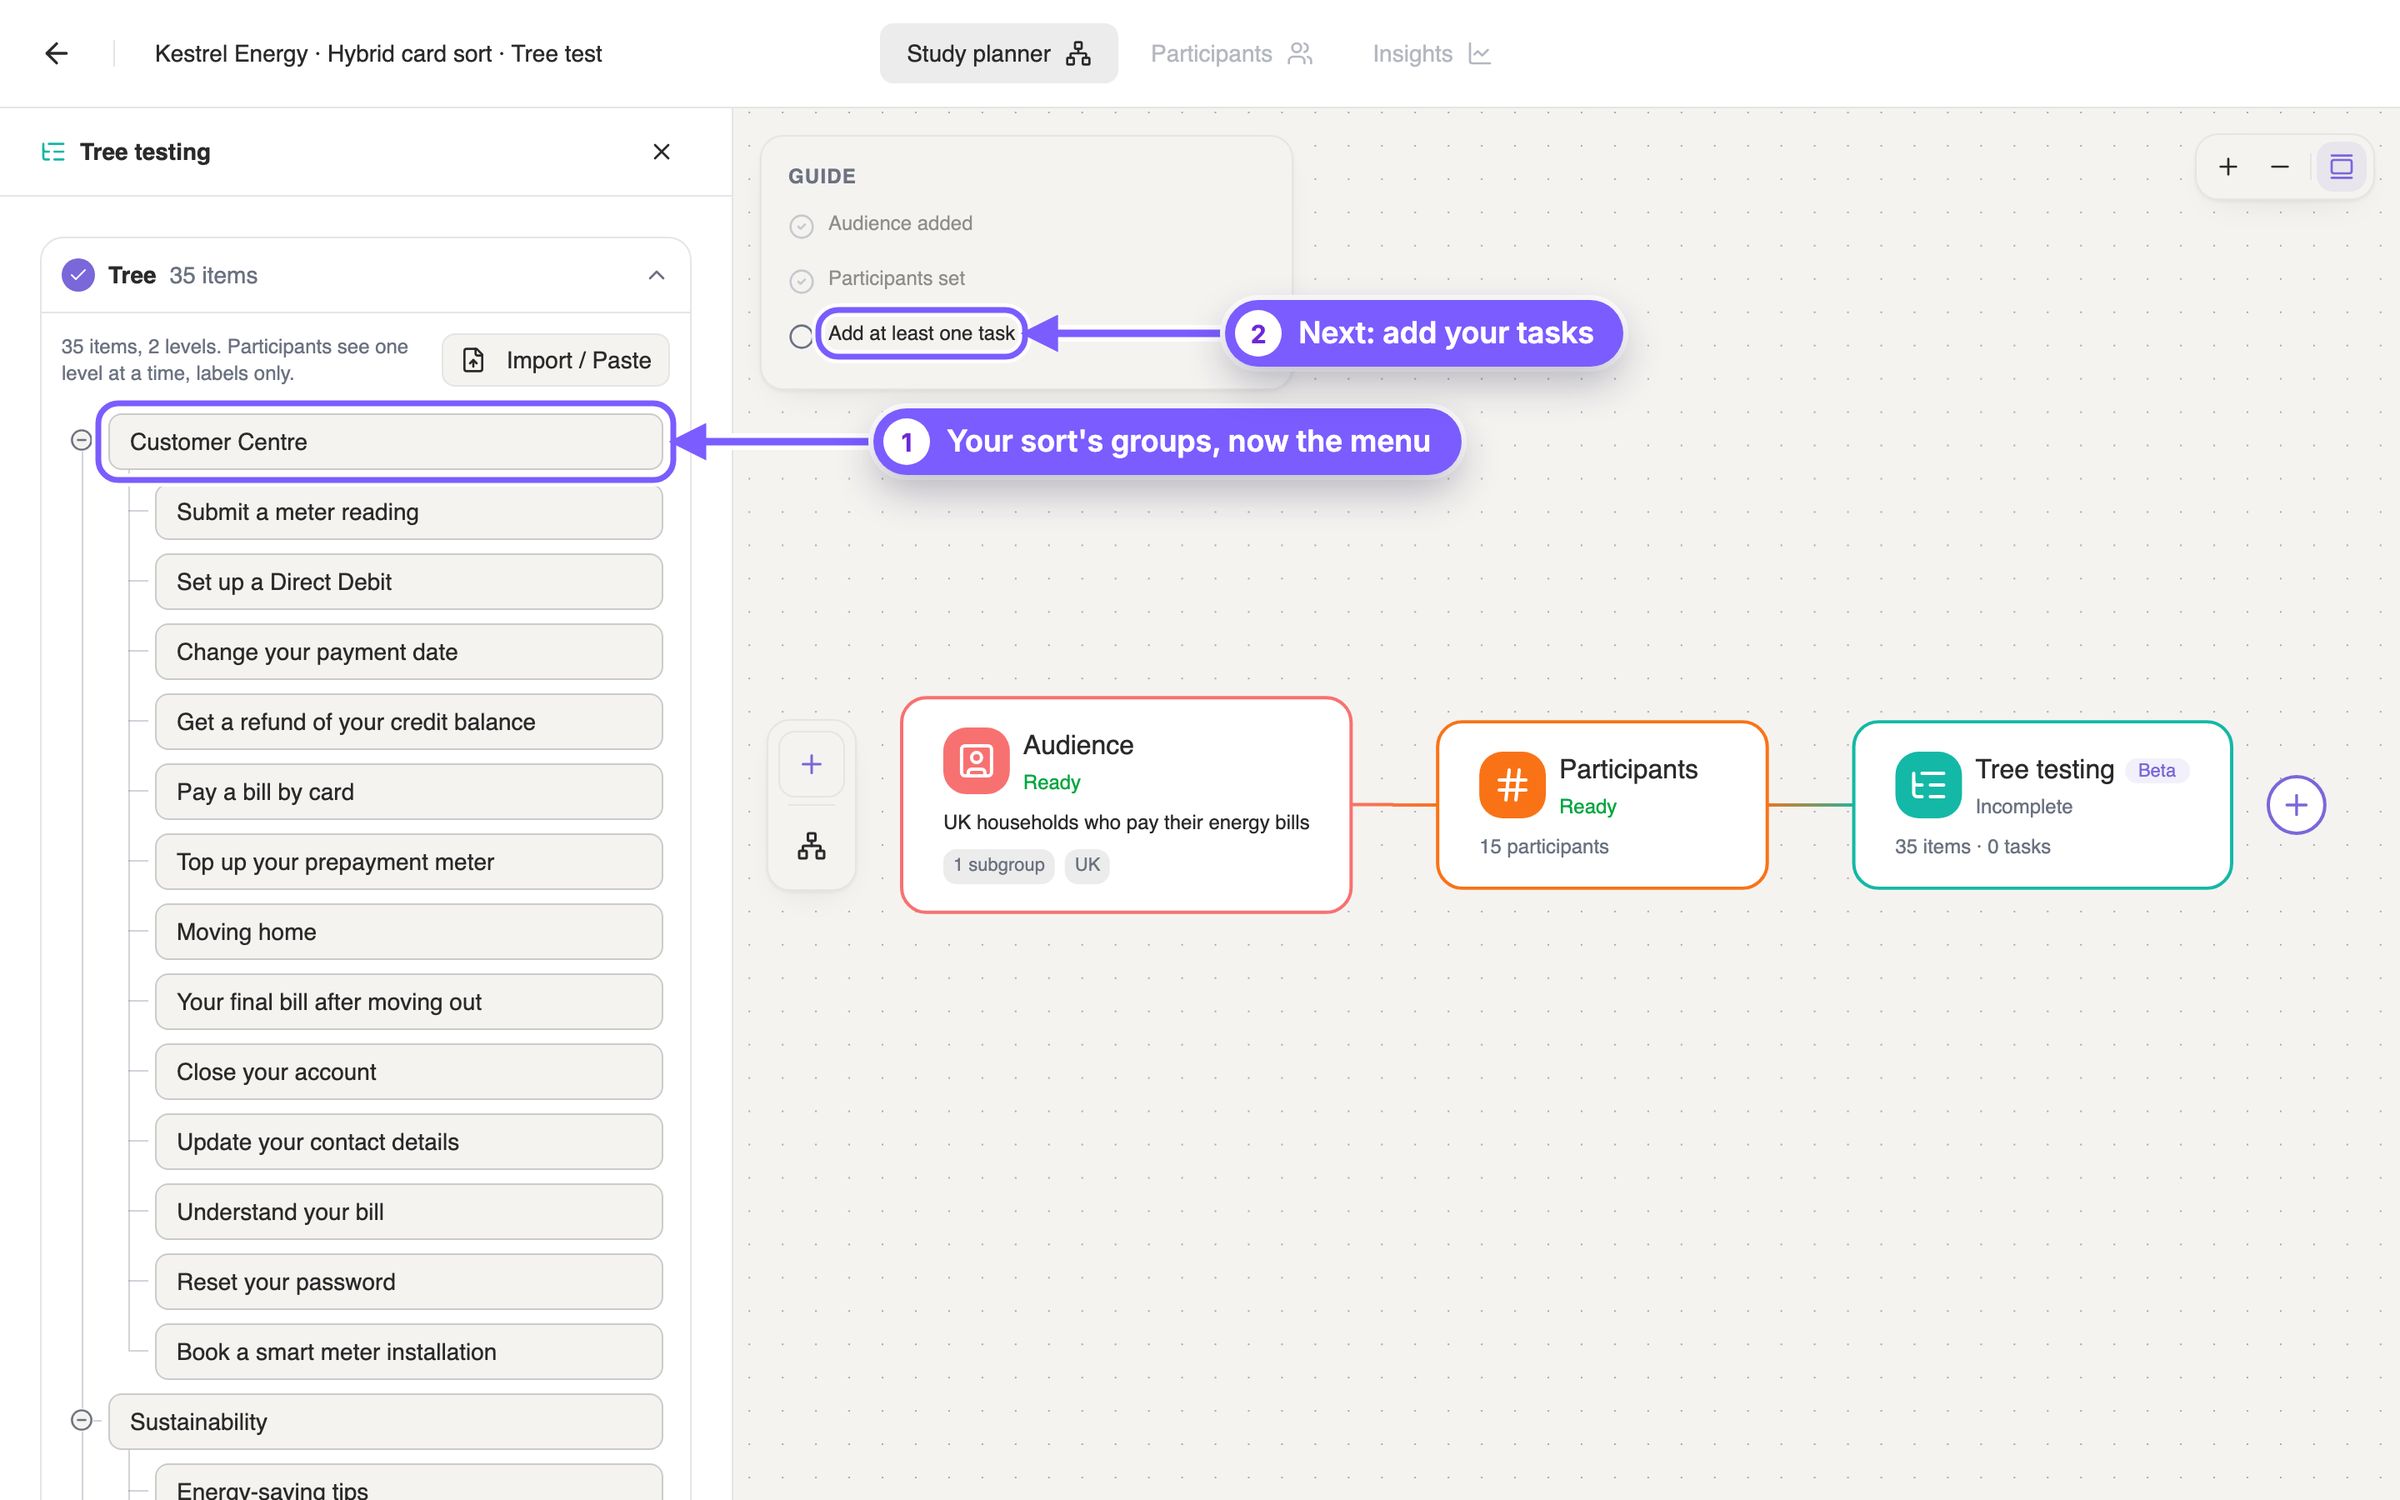
- 1Your sort's groups, now the menu. Each section from the sort is a top-level item, with its cards under it, ready to rename, move or delete.
- 2Next: add your tasks. The Guide shows what's left. Audience and number of participants come from the card sort: add tasks, generate participants and run.
Then add the tasks in the Tasks section, each with its correct answers.
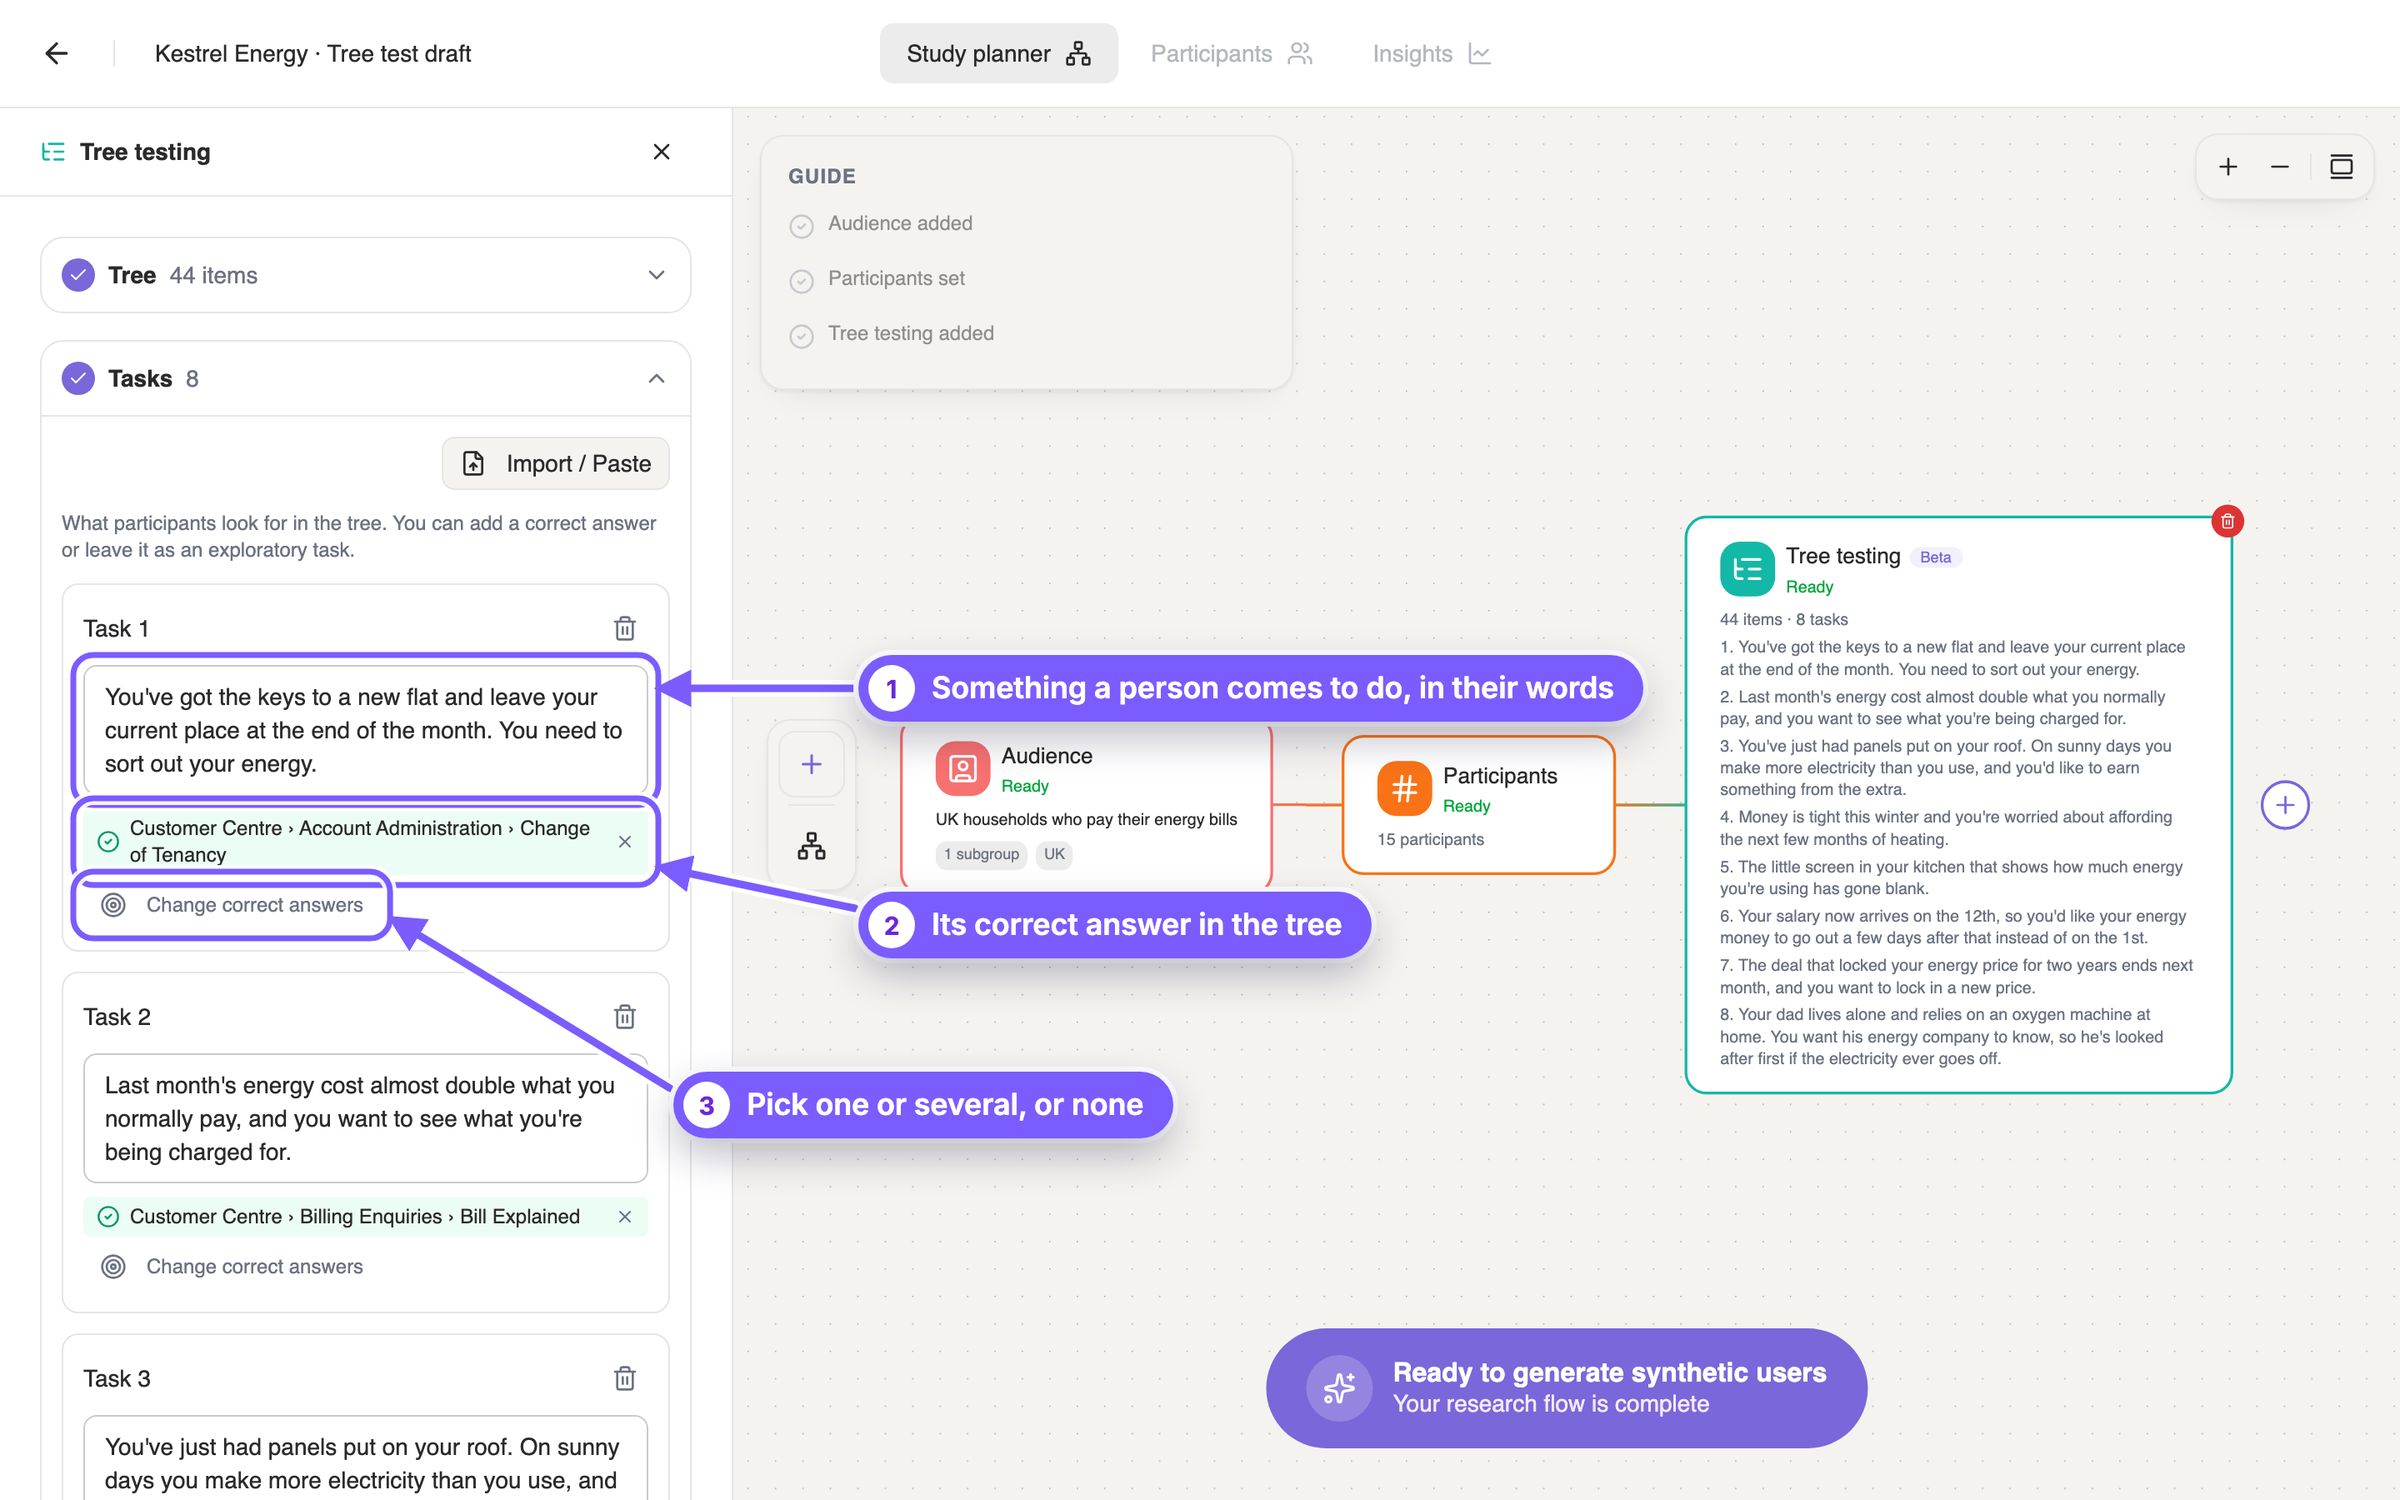
- 1Something a person comes to do, in their words. Write each task as a situation, not a label to look for: "you've got the keys to a new flat", rather than "find Change of Tenancy".
- 2Its correct answer in the tree. The full path to the right answer, so you can check it at a glance. A task can have more than one.
- 3Pick one or several, or none. Change correct answers opens the tree to pick them. A task with no correct answer is exploratory: it shows where people go, without a score.
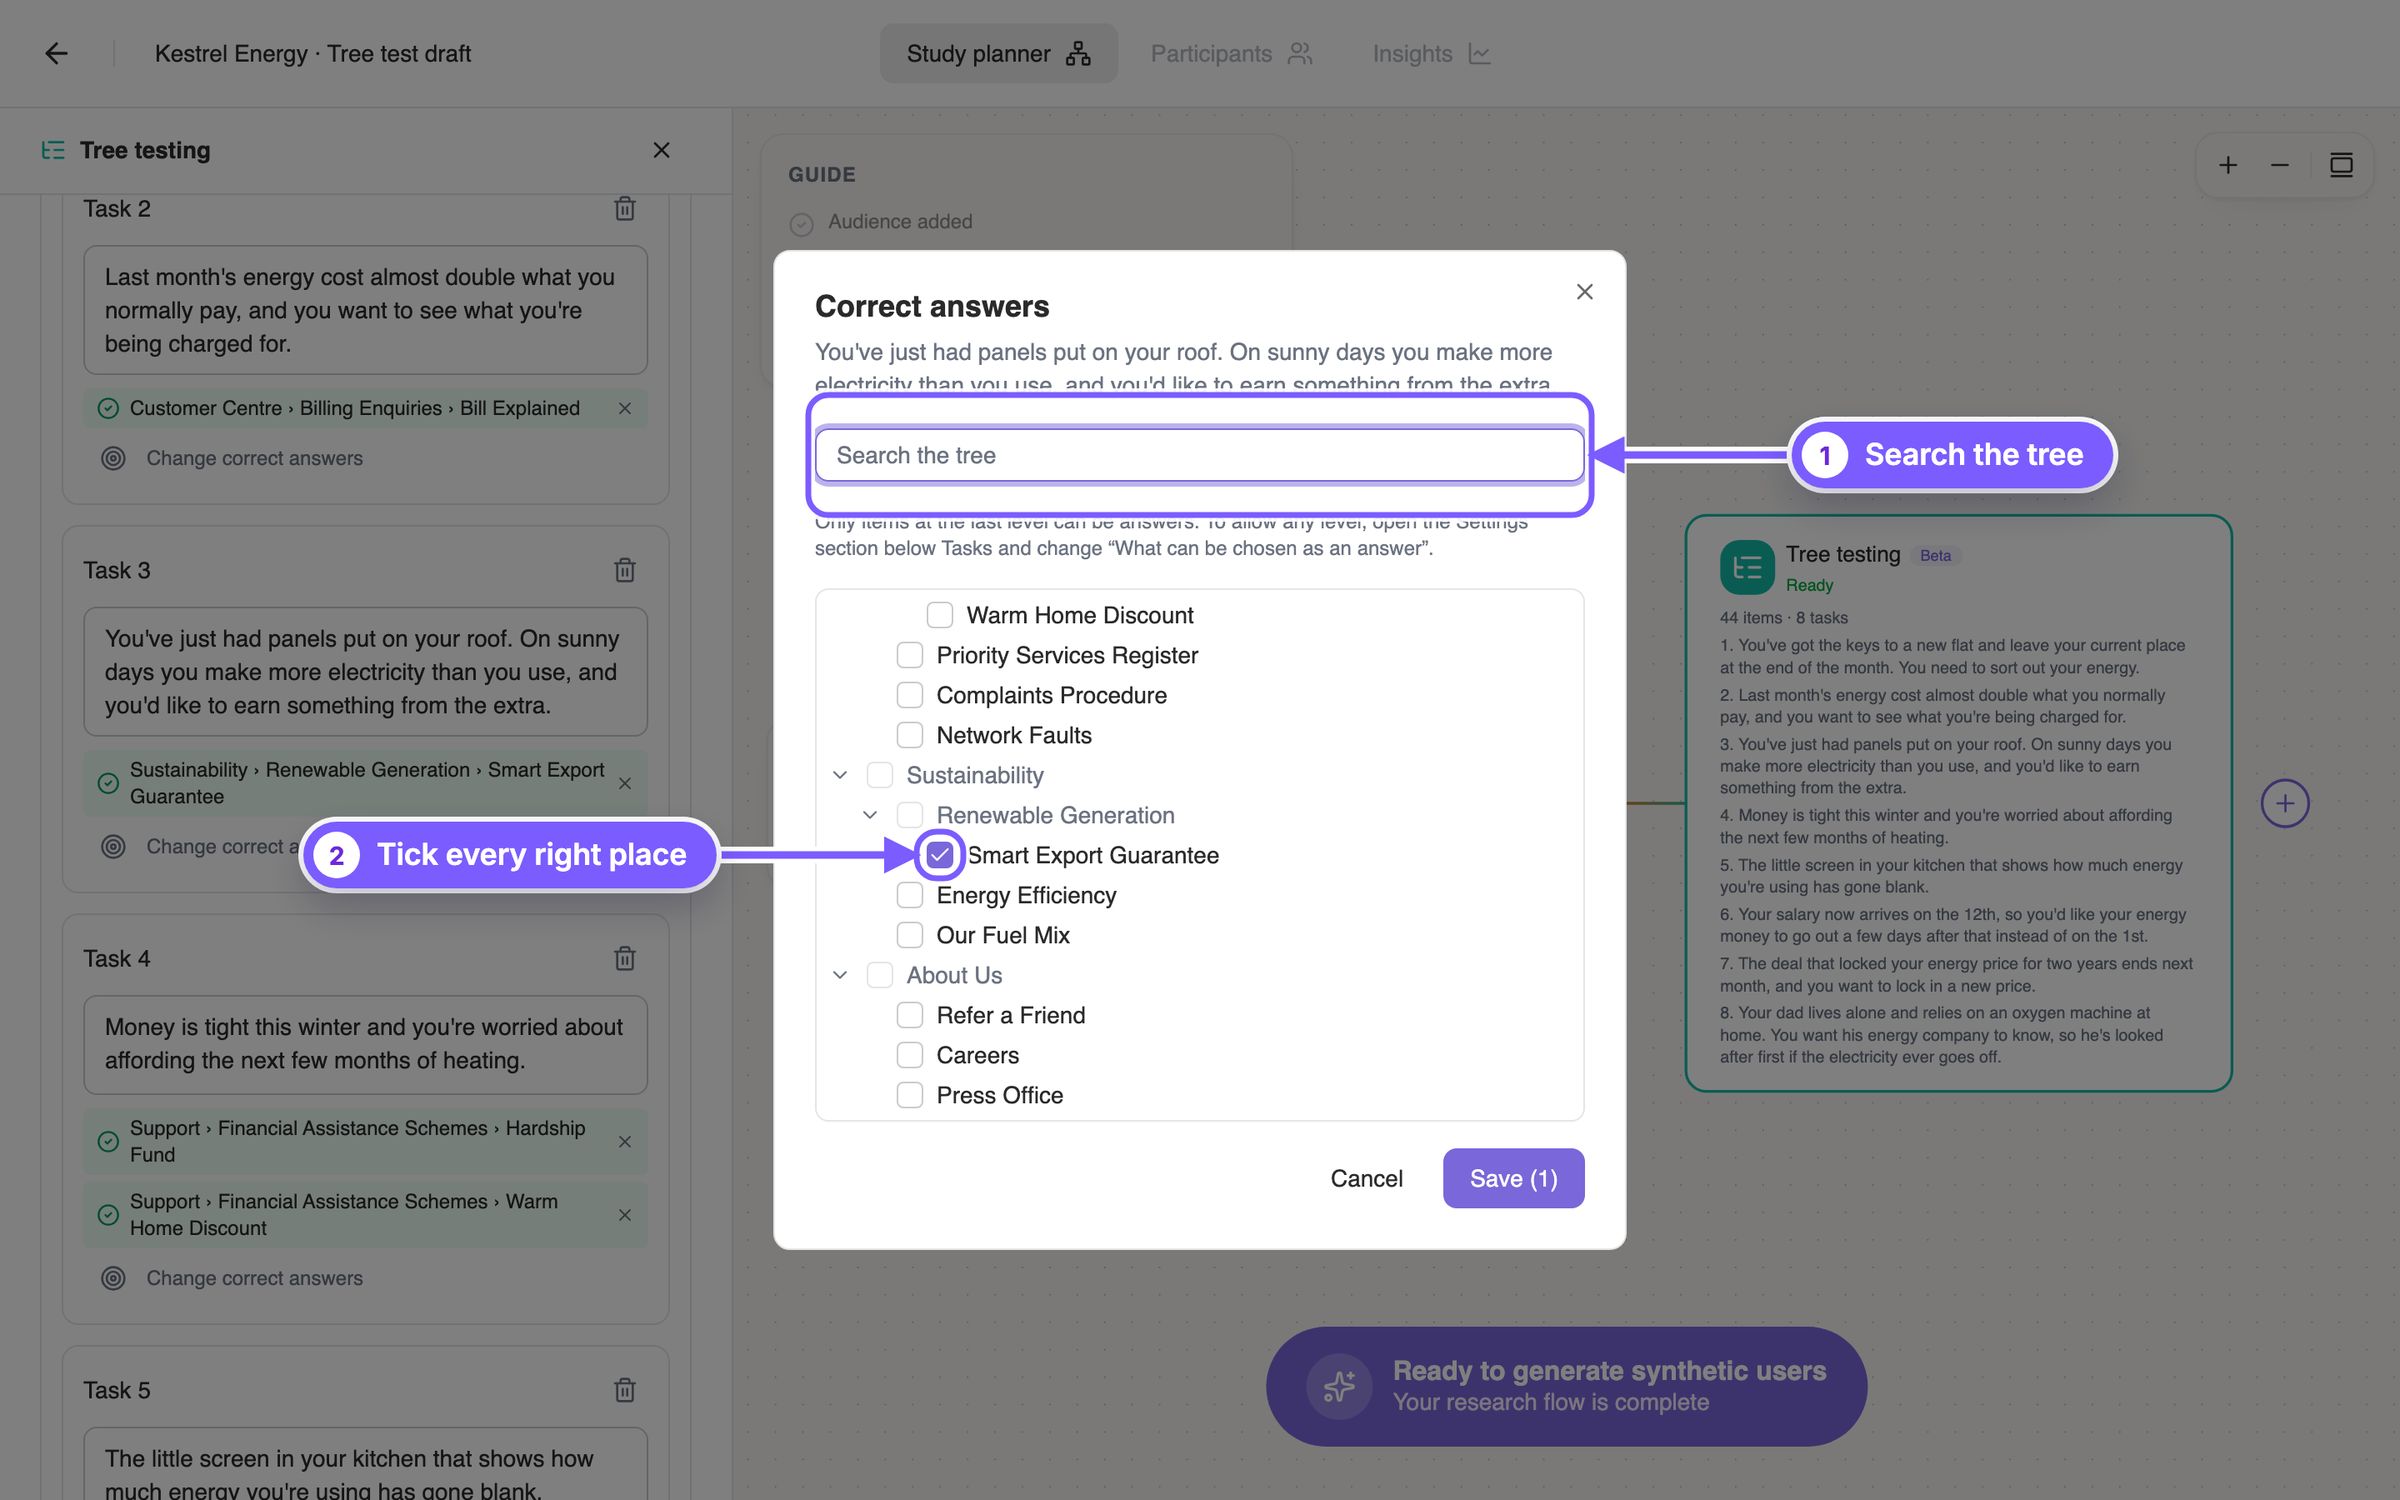
- 1Search the tree. Type part of a label to find it, however big the tree.
- 2Tick every right place. Tick each item that should count as a success. By default only items at the last level can be answers; to allow items at any level, change What can be chosen as an answer in Settings.
Settings
Every setting is numbered on the screenshot and explained below it. The three switches start on. Confidence, ease and the reason for every move are always asked, so they have no setting.
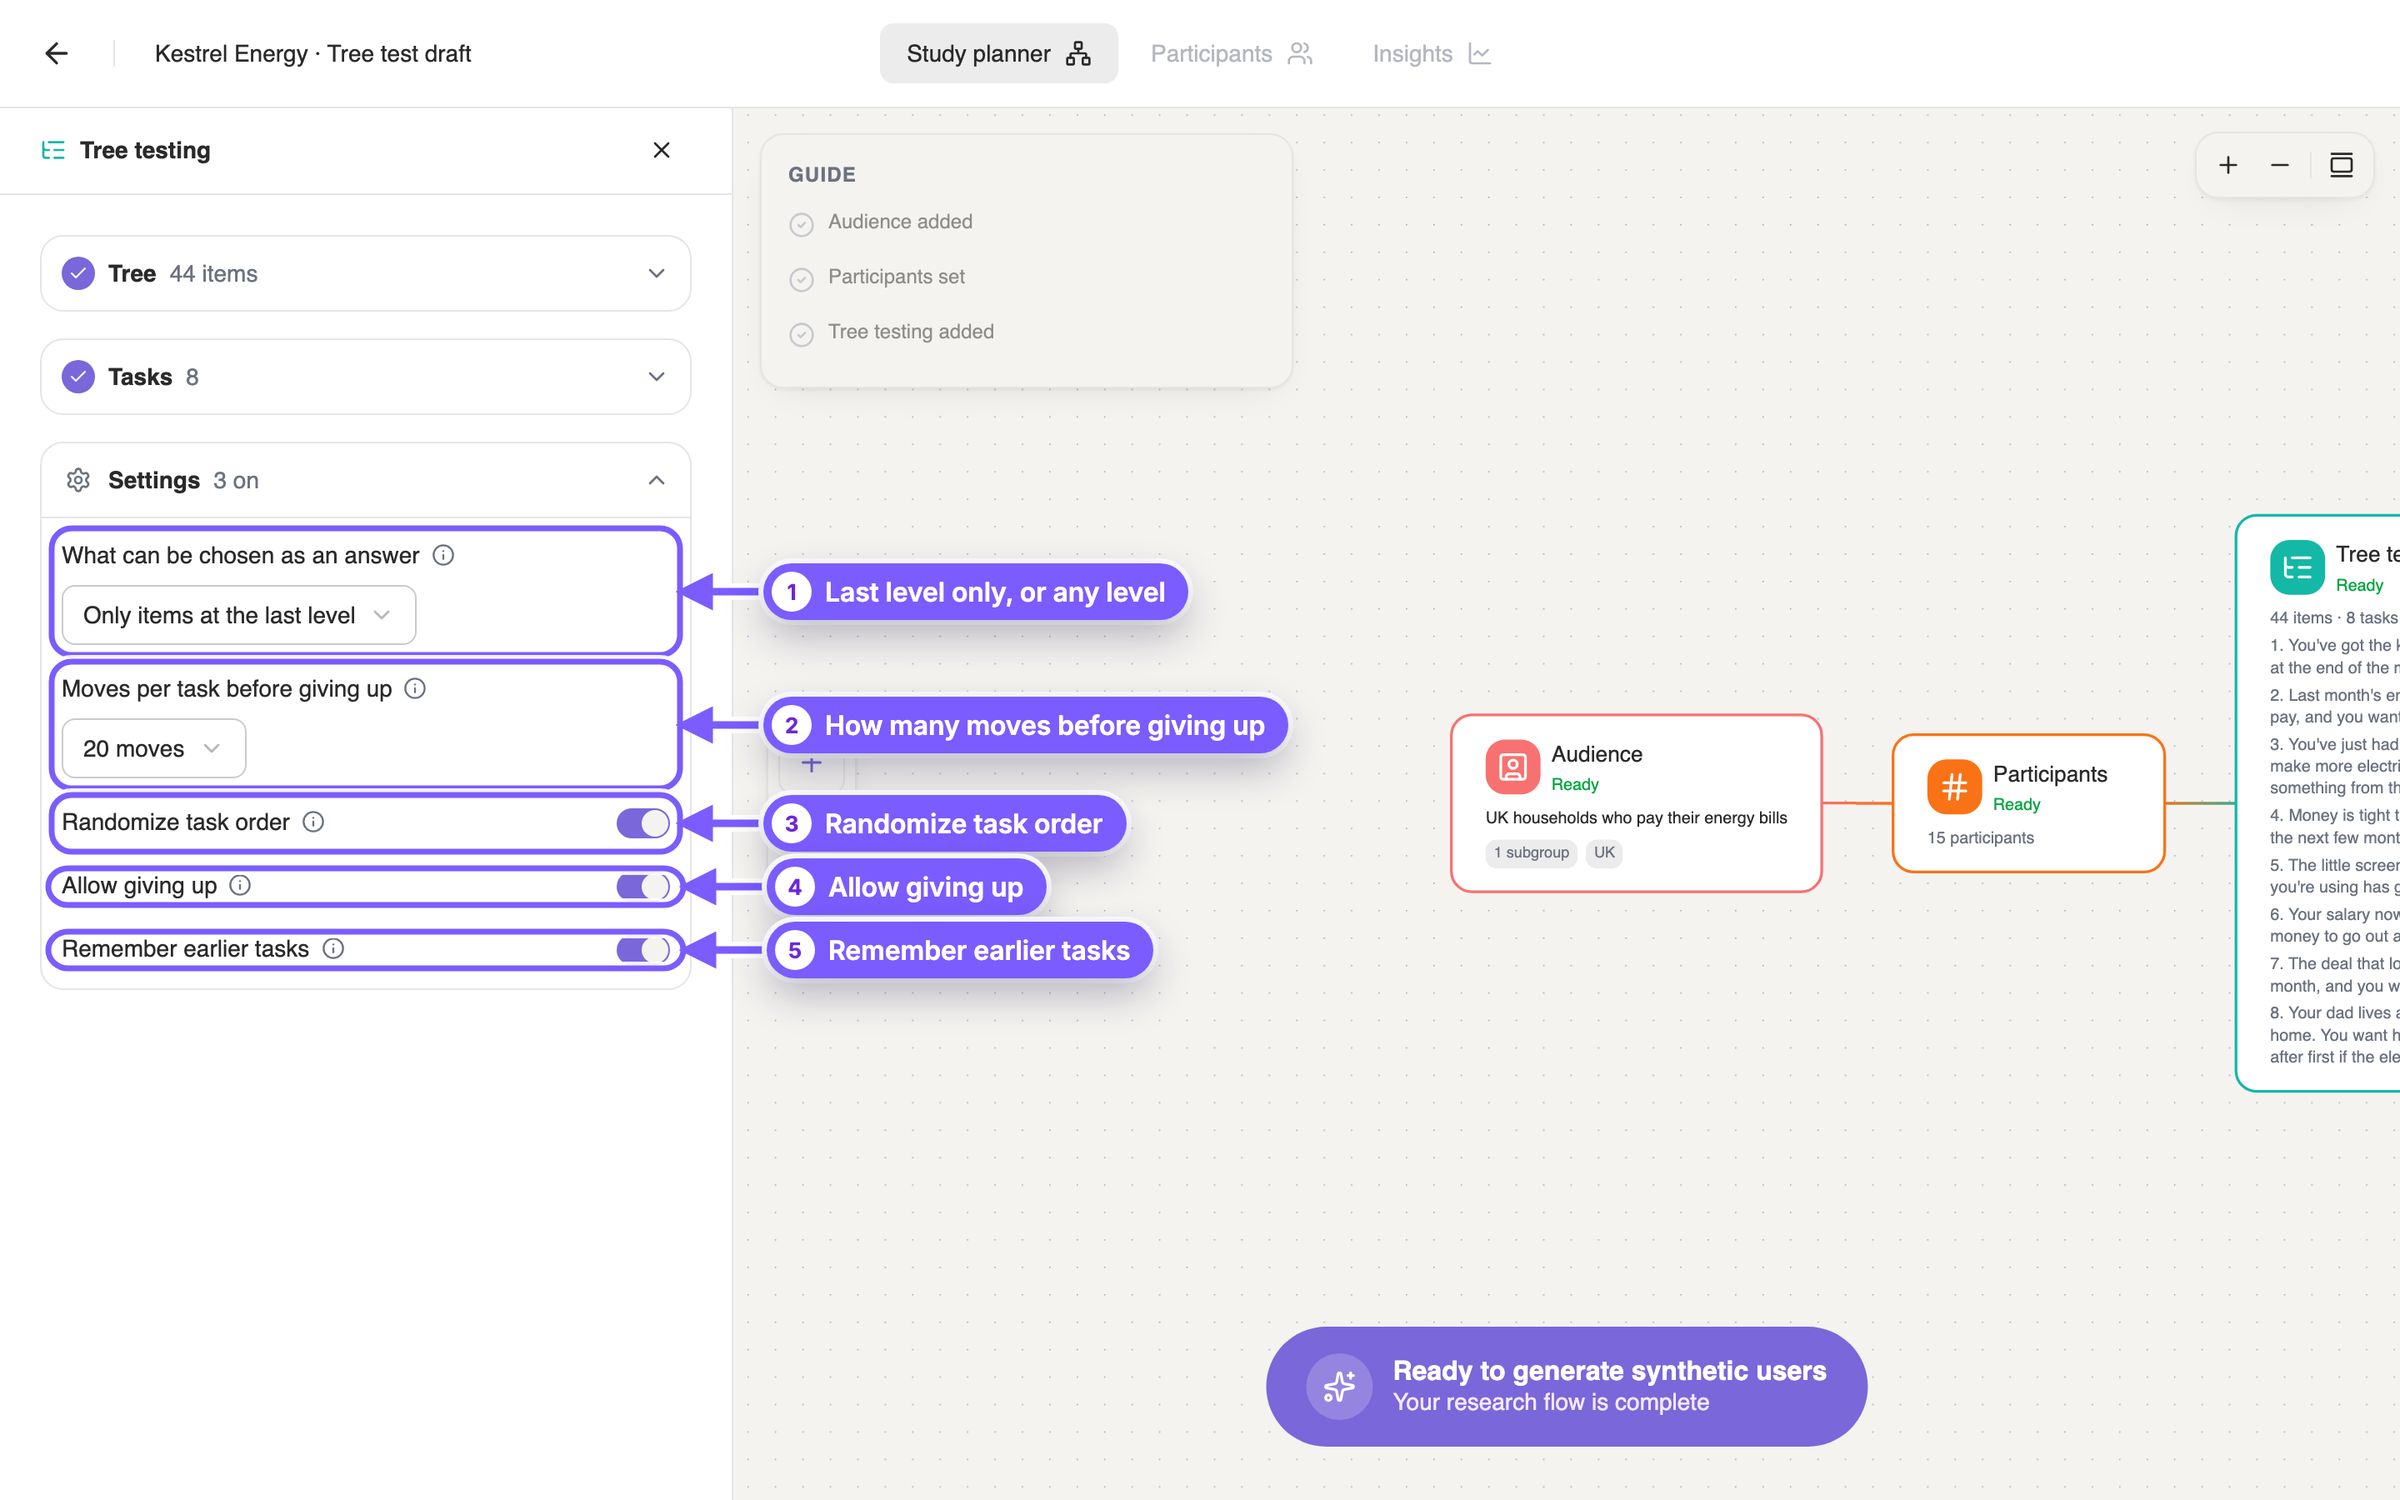
- 1Last level only, or any level. What can be chosen as an answer. Most tree tests use the last level (the default): sections are for finding your way, the items at the end are the answers.
- 2How many moves before giving up. A move is opening an item or going back up. A participant who hasn't chosen an answer by then counts as a skip. Allow more for a deep or large tree.
- 3Randomize task order. Each participant gets the tasks in a different order, so what they learn about the tree in early tasks evens out across tasks.
- 4Allow giving up. Participants can skip a task they can't complete, and skips are reported separately. Turn it off and they keep looking until they choose an answer or run out of moves.
- 5Remember earlier tasks. Participants remember the menus they saw in earlier tasks, as people do. Turn it off to treat every task as a first visit.
Then generate the participants and click Run Tree Test. While it runs, each participant sees your menu as plain text, one level at a time, with no search box and nothing else from your design. They open sections, go back, choose an answer or give up, saying what they are thinking at every move, and rate how sure they were and how easy each task felt.
How to read the results
The results are under Insights, in three tabs: Responses, each participant's tasks; Tree test summary, everything added up, as an Overview or By task; and Report. Where a percentage isn't obvious, the list under its screenshot says how it's calculated.
Responses: each participant's tasks
One row per participant, with a mark for every task. Open a participant to see each task's outcome, their ratings and their route through the menu.
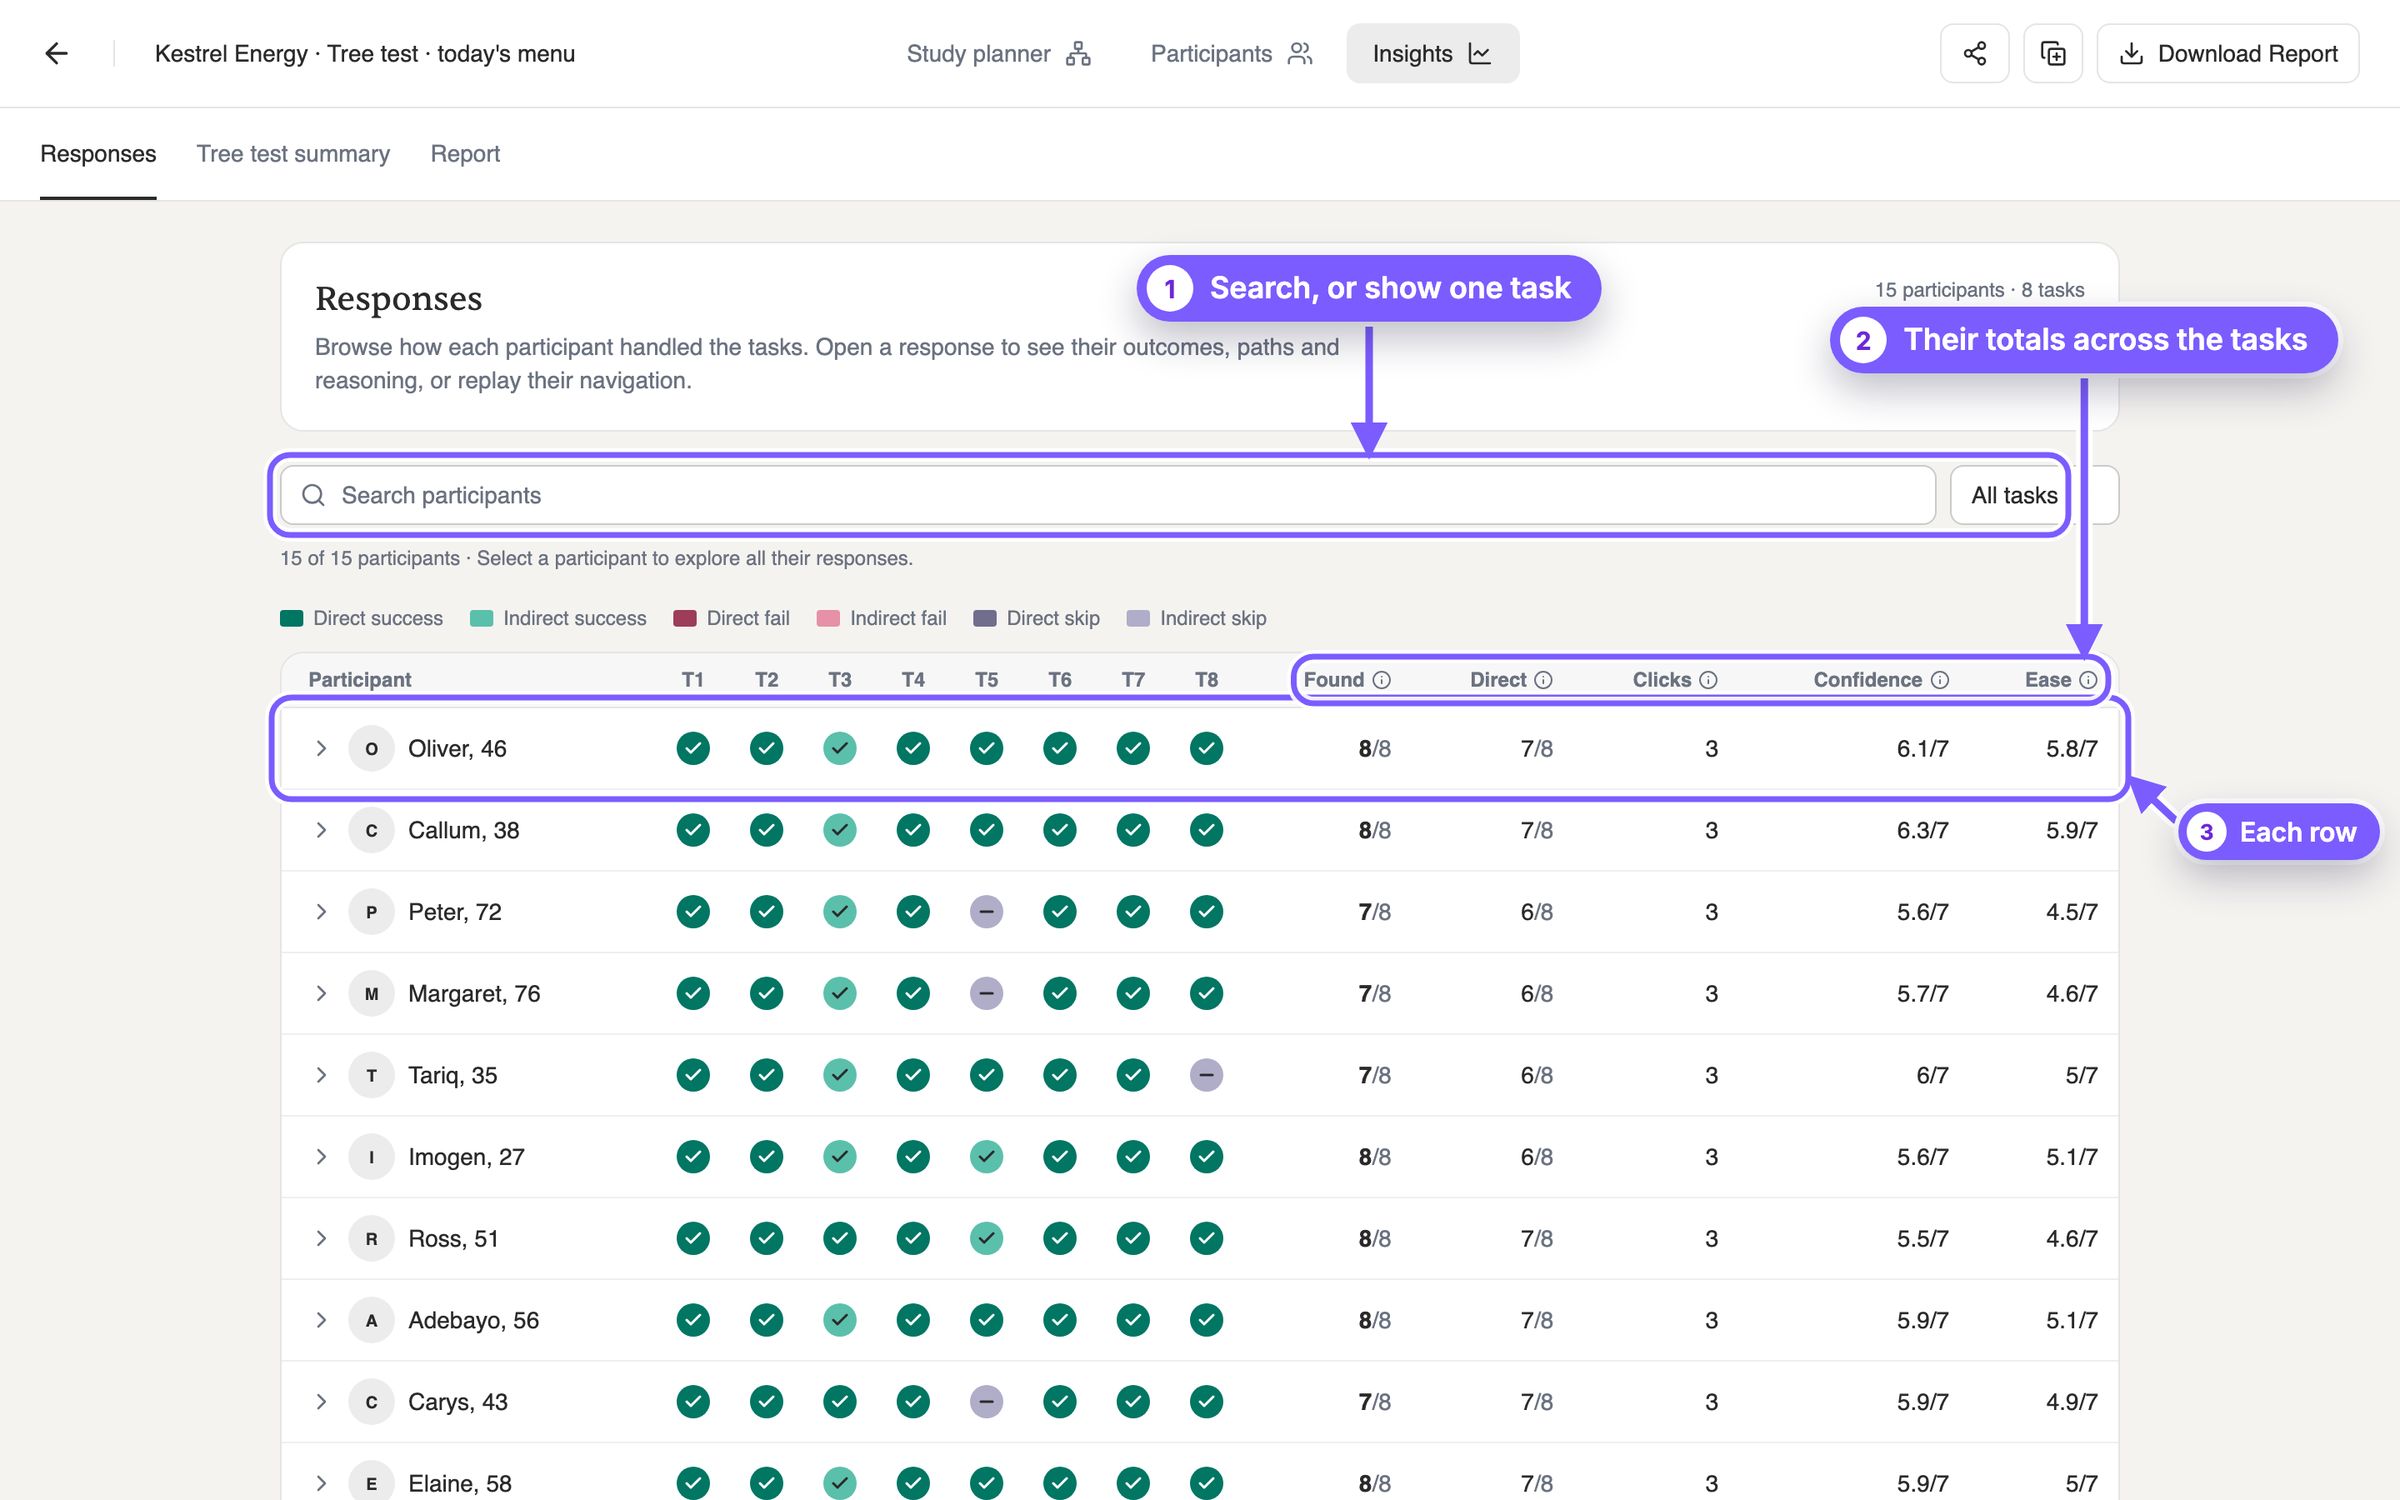
- 1Search, or show one task. Search participants by name, or pick a task to see only how that task went.
- 2Their totals across the tasks. Found: tasks with a correct answer. Direct: tasks answered without going back up the tree. Clicks: their clicks in a typical task. Confidence and Ease: averages out of 7.
- 3Each row. One participant, with a mark per task coloured by how it ended (key above the table). Success, fail or skip says whether they chose a correct answer, a wrong one, or gave up. Direct means they never went back up the tree; indirect, that they went back at least once. A skip is direct only if they gave up before opening anything. Hover a task number to read it; click a row to open their responses.
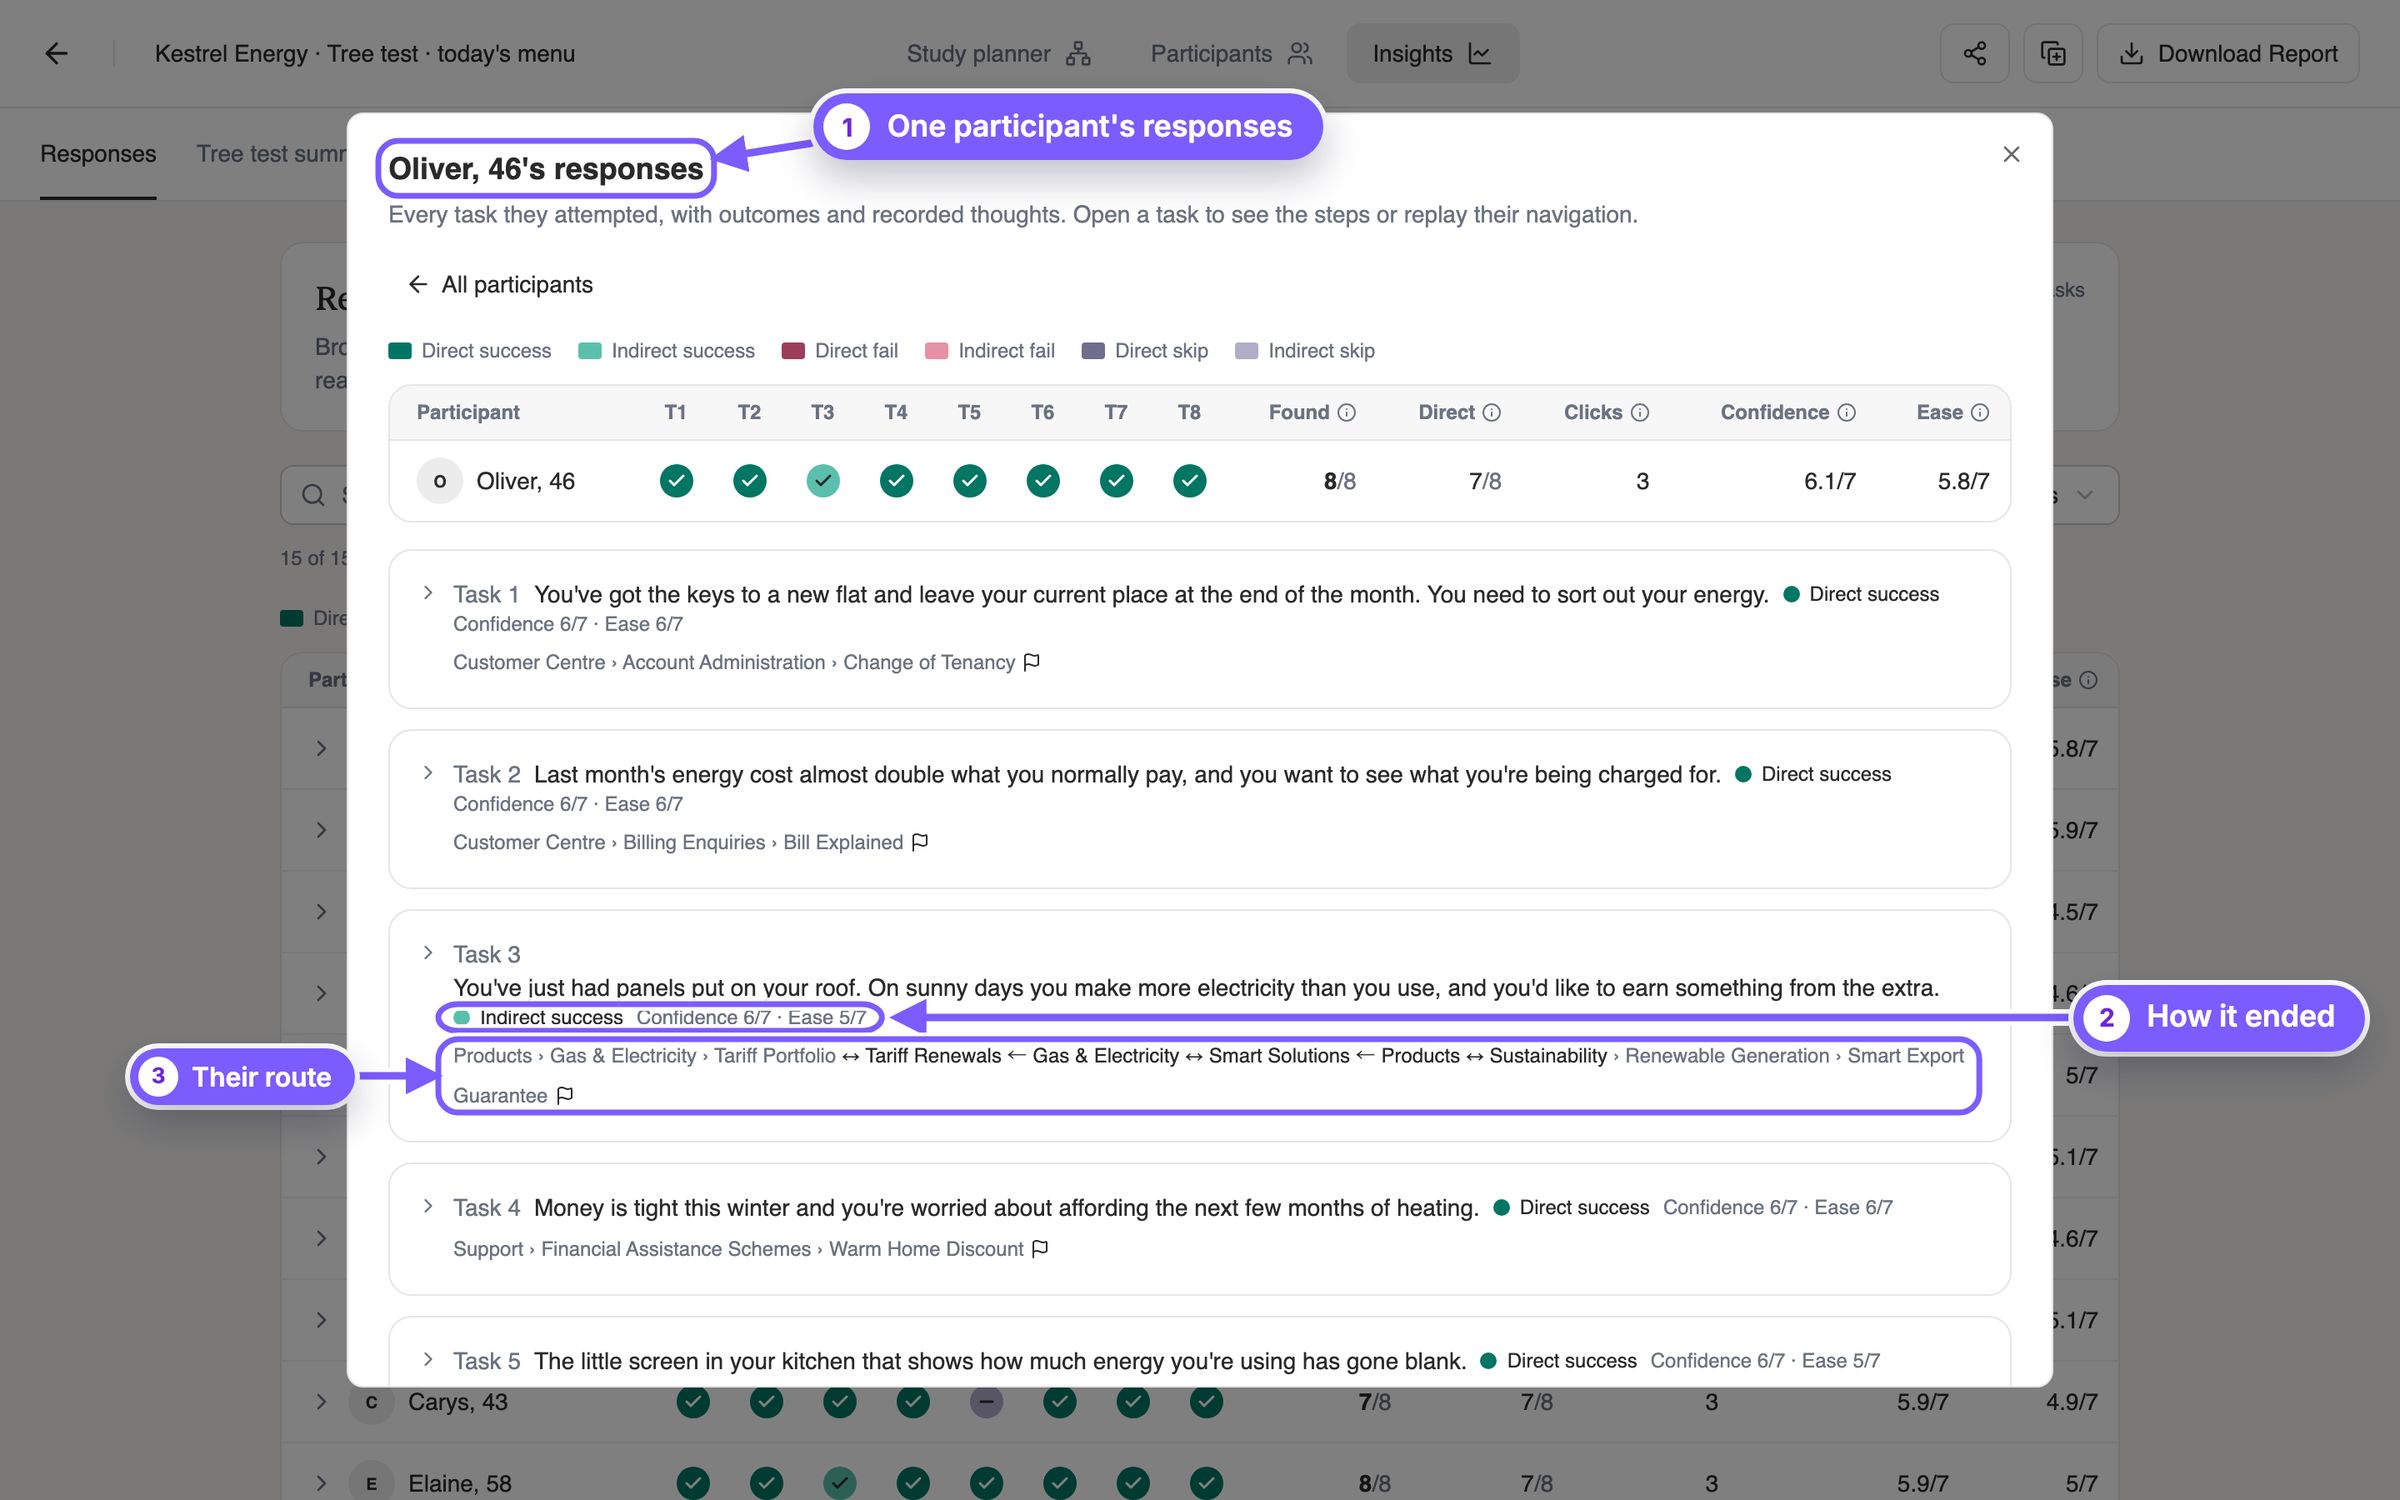
- 1One participant's responses. Their profile and the same row as on the Responses tab. All participants goes back to the list.
- 2How it ended. Each task shows how it ended, how sure they were and how easy it felt, both out of 7. Sure and wrong, or right but hard, are both worth a closer look.
- 3Their route. Every move through the menu. Open a task to see each step and what they were thinking, or replay it.
The headline scores
Four scores across every task, and each task's success rate. Click a task to open it.
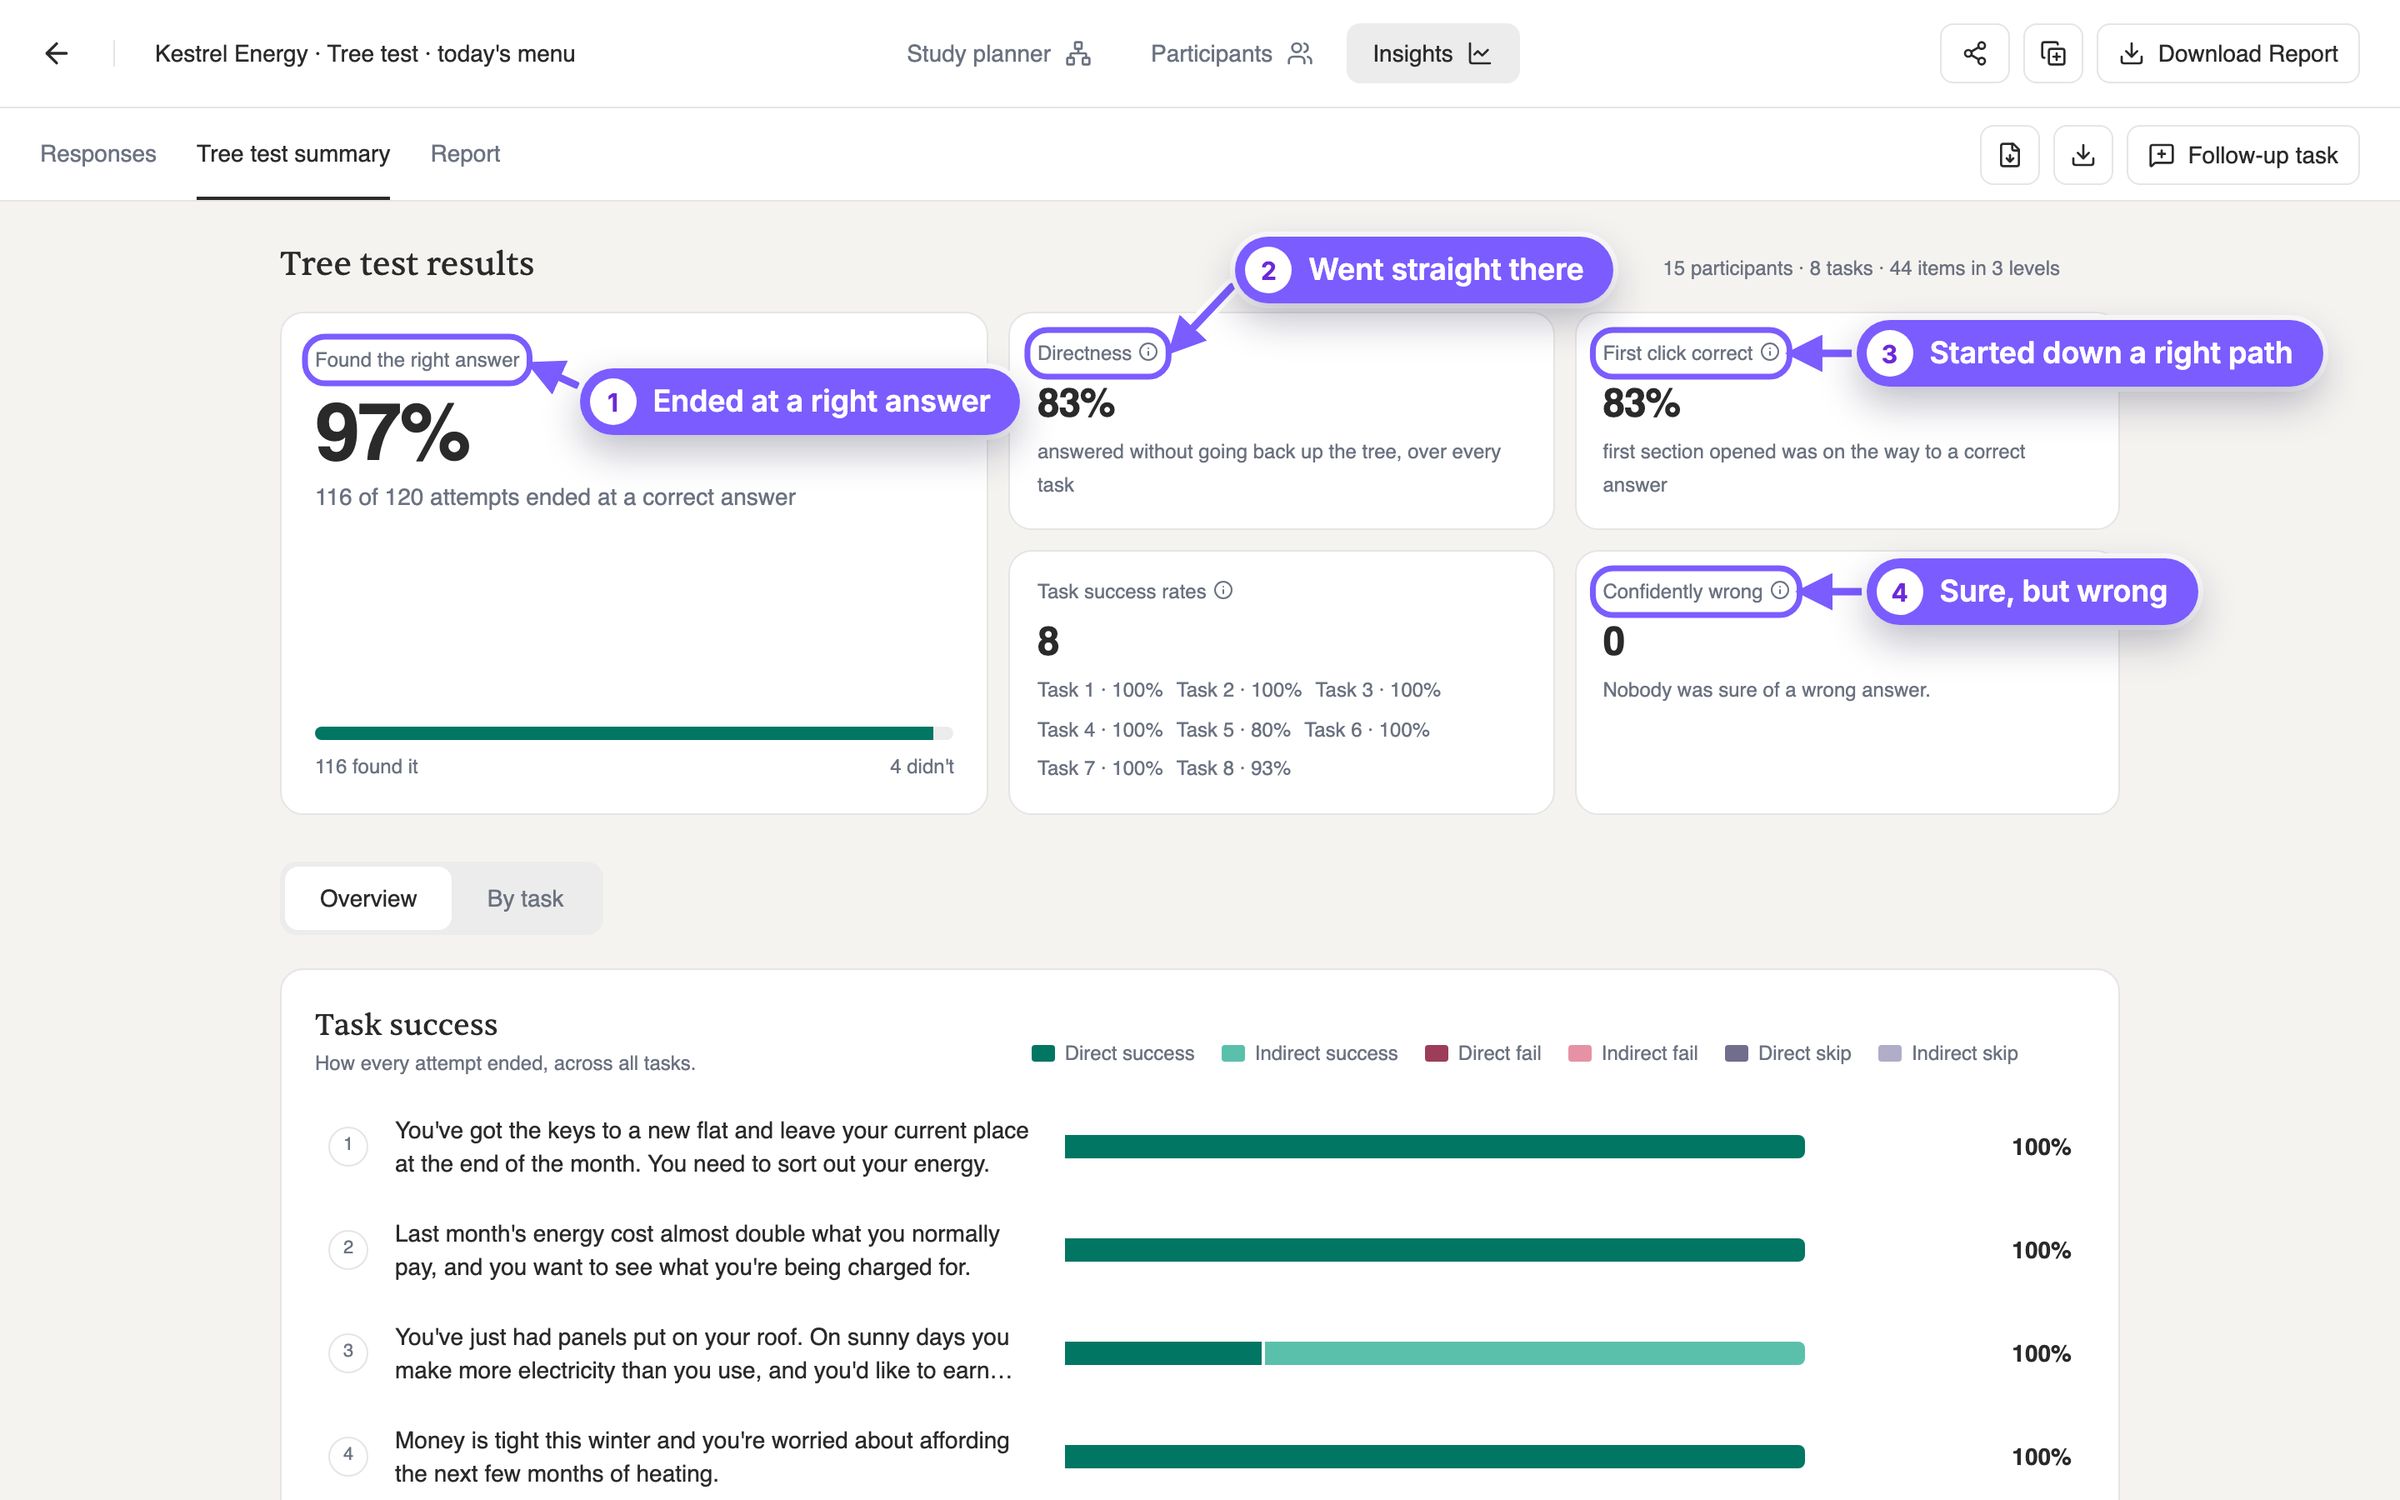
- 1Ended at a right answer. Found the right answer: how many attempts ended at a correct answer. The bar under it splits the attempts into those that found it and those that didn't.
- 2Went straight there. Directness: the share of all attempts that never went back up the tree, right or wrong; a give-up counts as direct only if they opened nothing. High success with lower directness means people get there, but only after trying the wrong places.
- 3Started down a right path. First click correct: how often the first section opened was on the way to a right answer. People who start right usually finish right, so a low score points at your top-level labels.
- 4Sure, but wrong. Confidently wrong: wrong answers given with a confidence of 6 out of 7 or more. These are the failures people never report, because they think they succeeded.
Task success and where answers landed
Task success puts the tasks side by side, so the hard ones stand out. Where answers landed shows where people ended up on each task: a wrong answer many people agree on usually points at a misleading label.
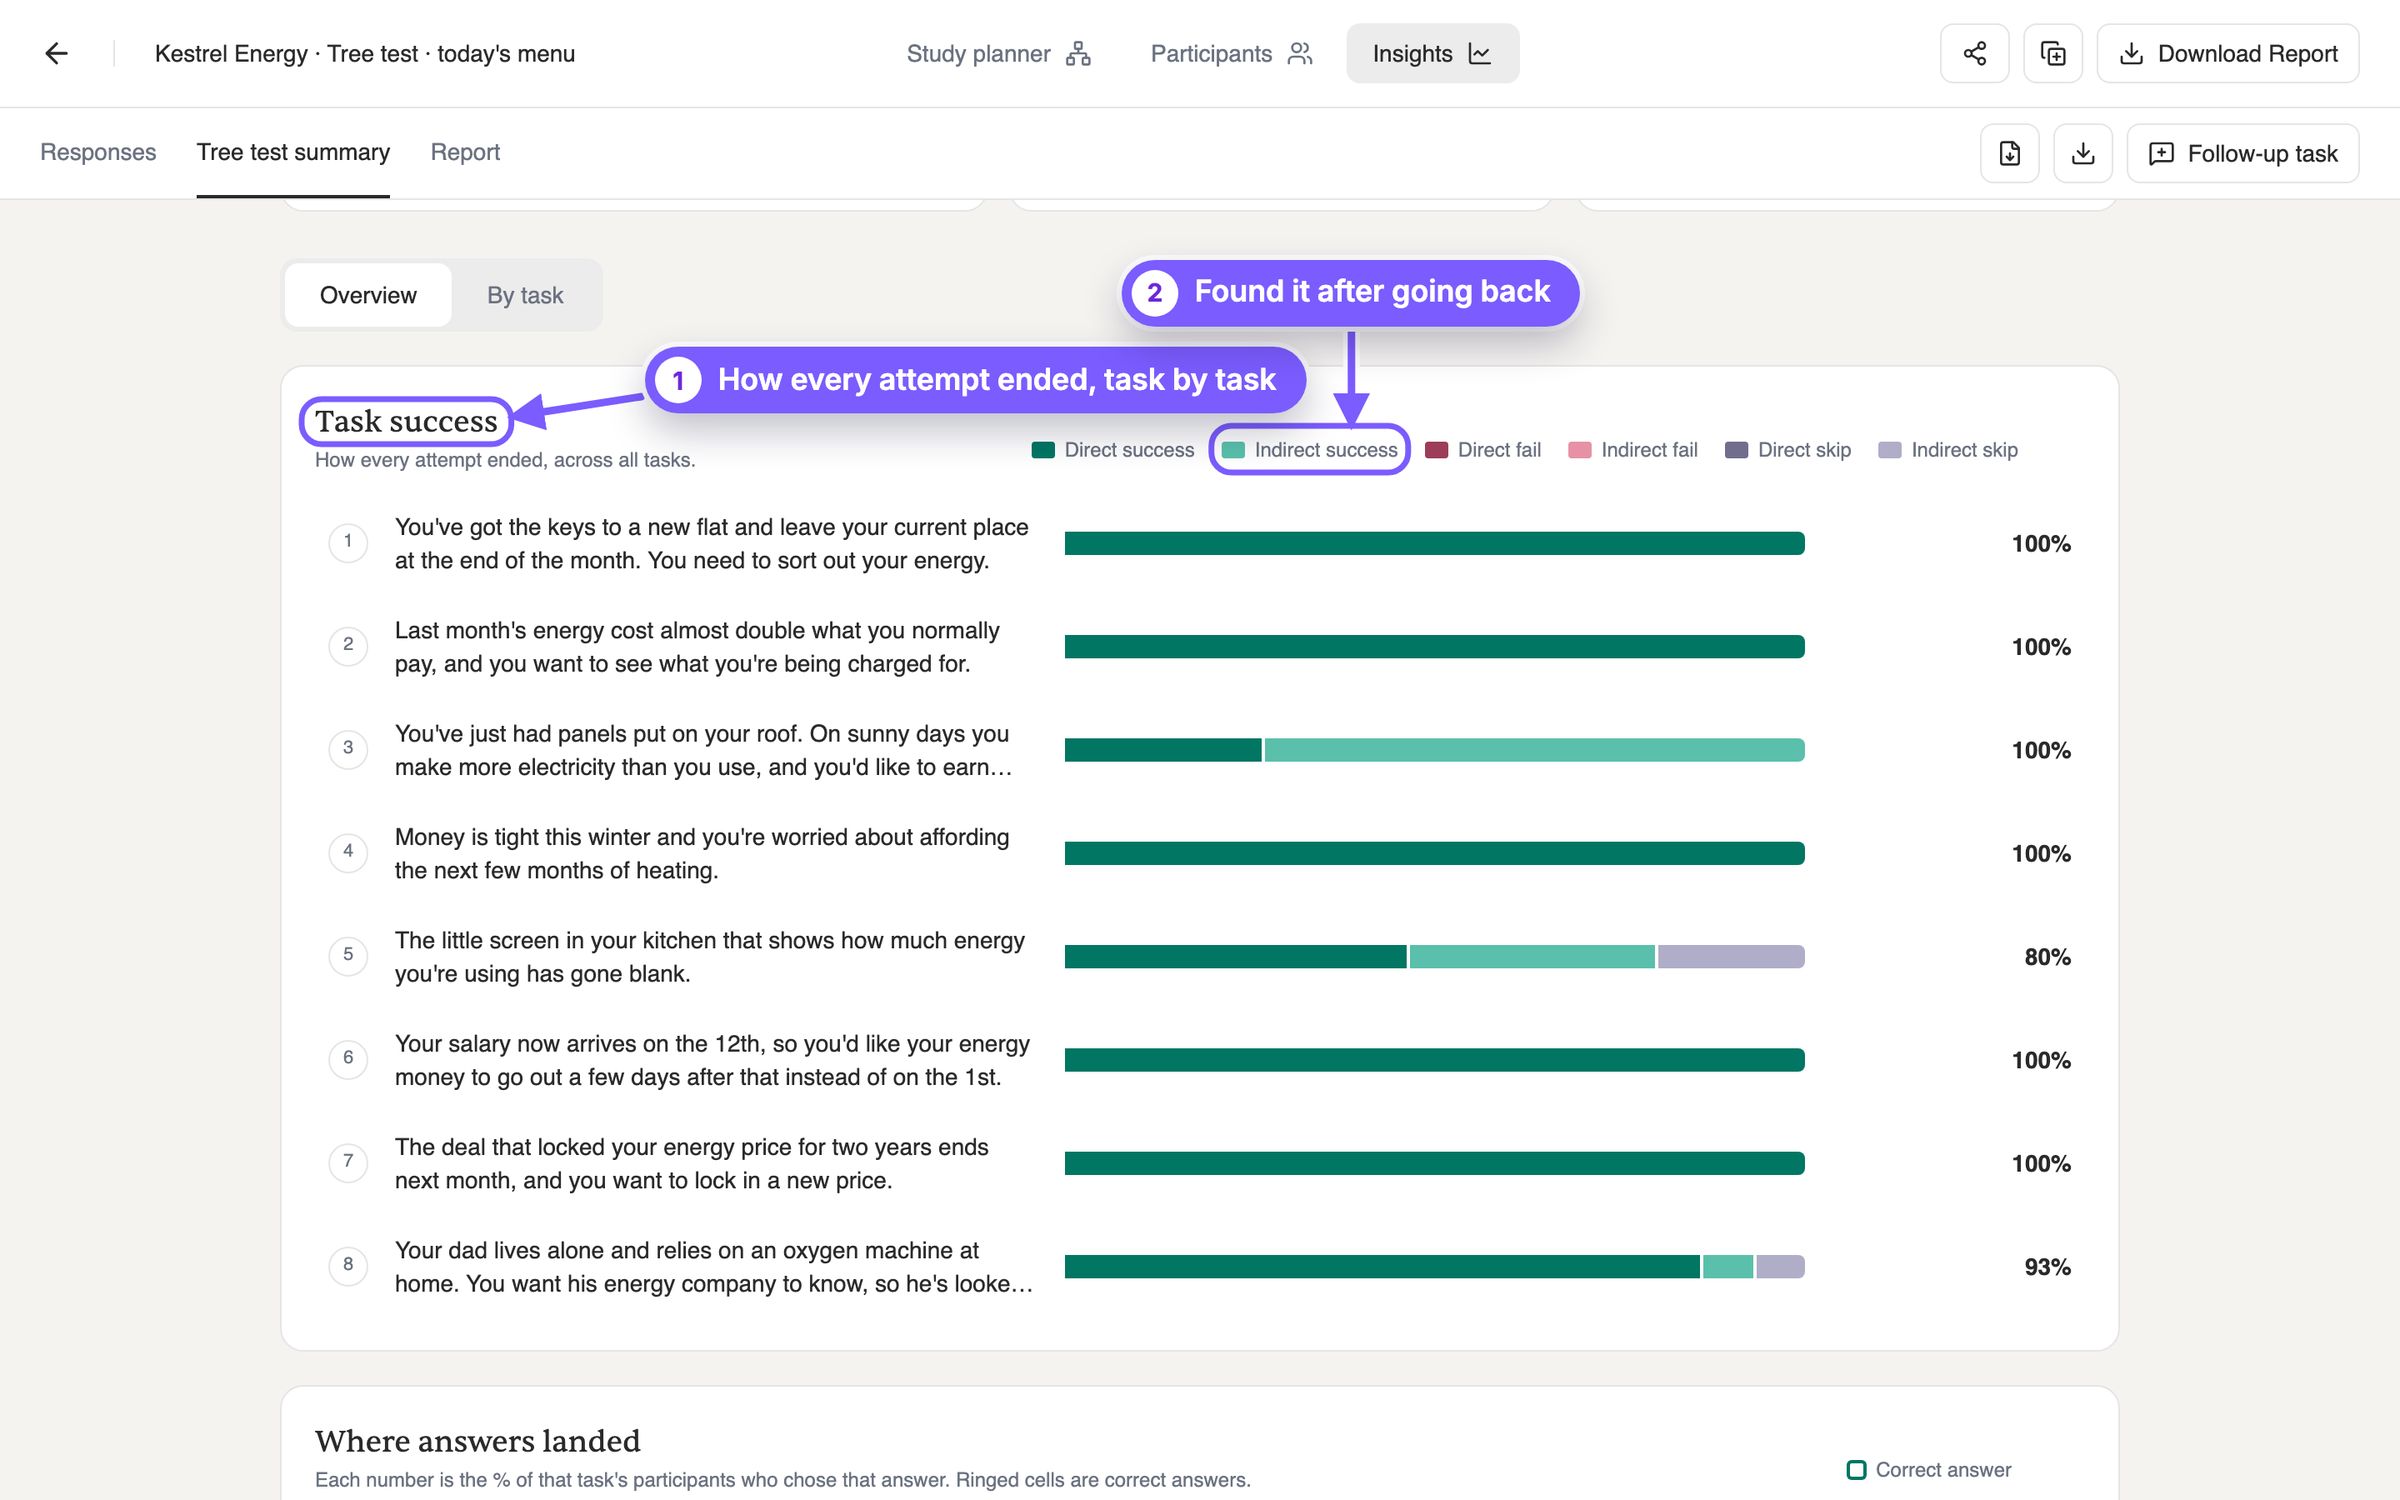
- 1How every attempt ended, task by task. One bar per task, split by how the attempts ended: direct or indirect success, direct or indirect fail, and skips. Look for bars with less dark green.
- 2Found it after going back. Indirect success: the right answer in the end, after going back up the tree at least once. A lot of it on one task means a label is drawing people the wrong way first.
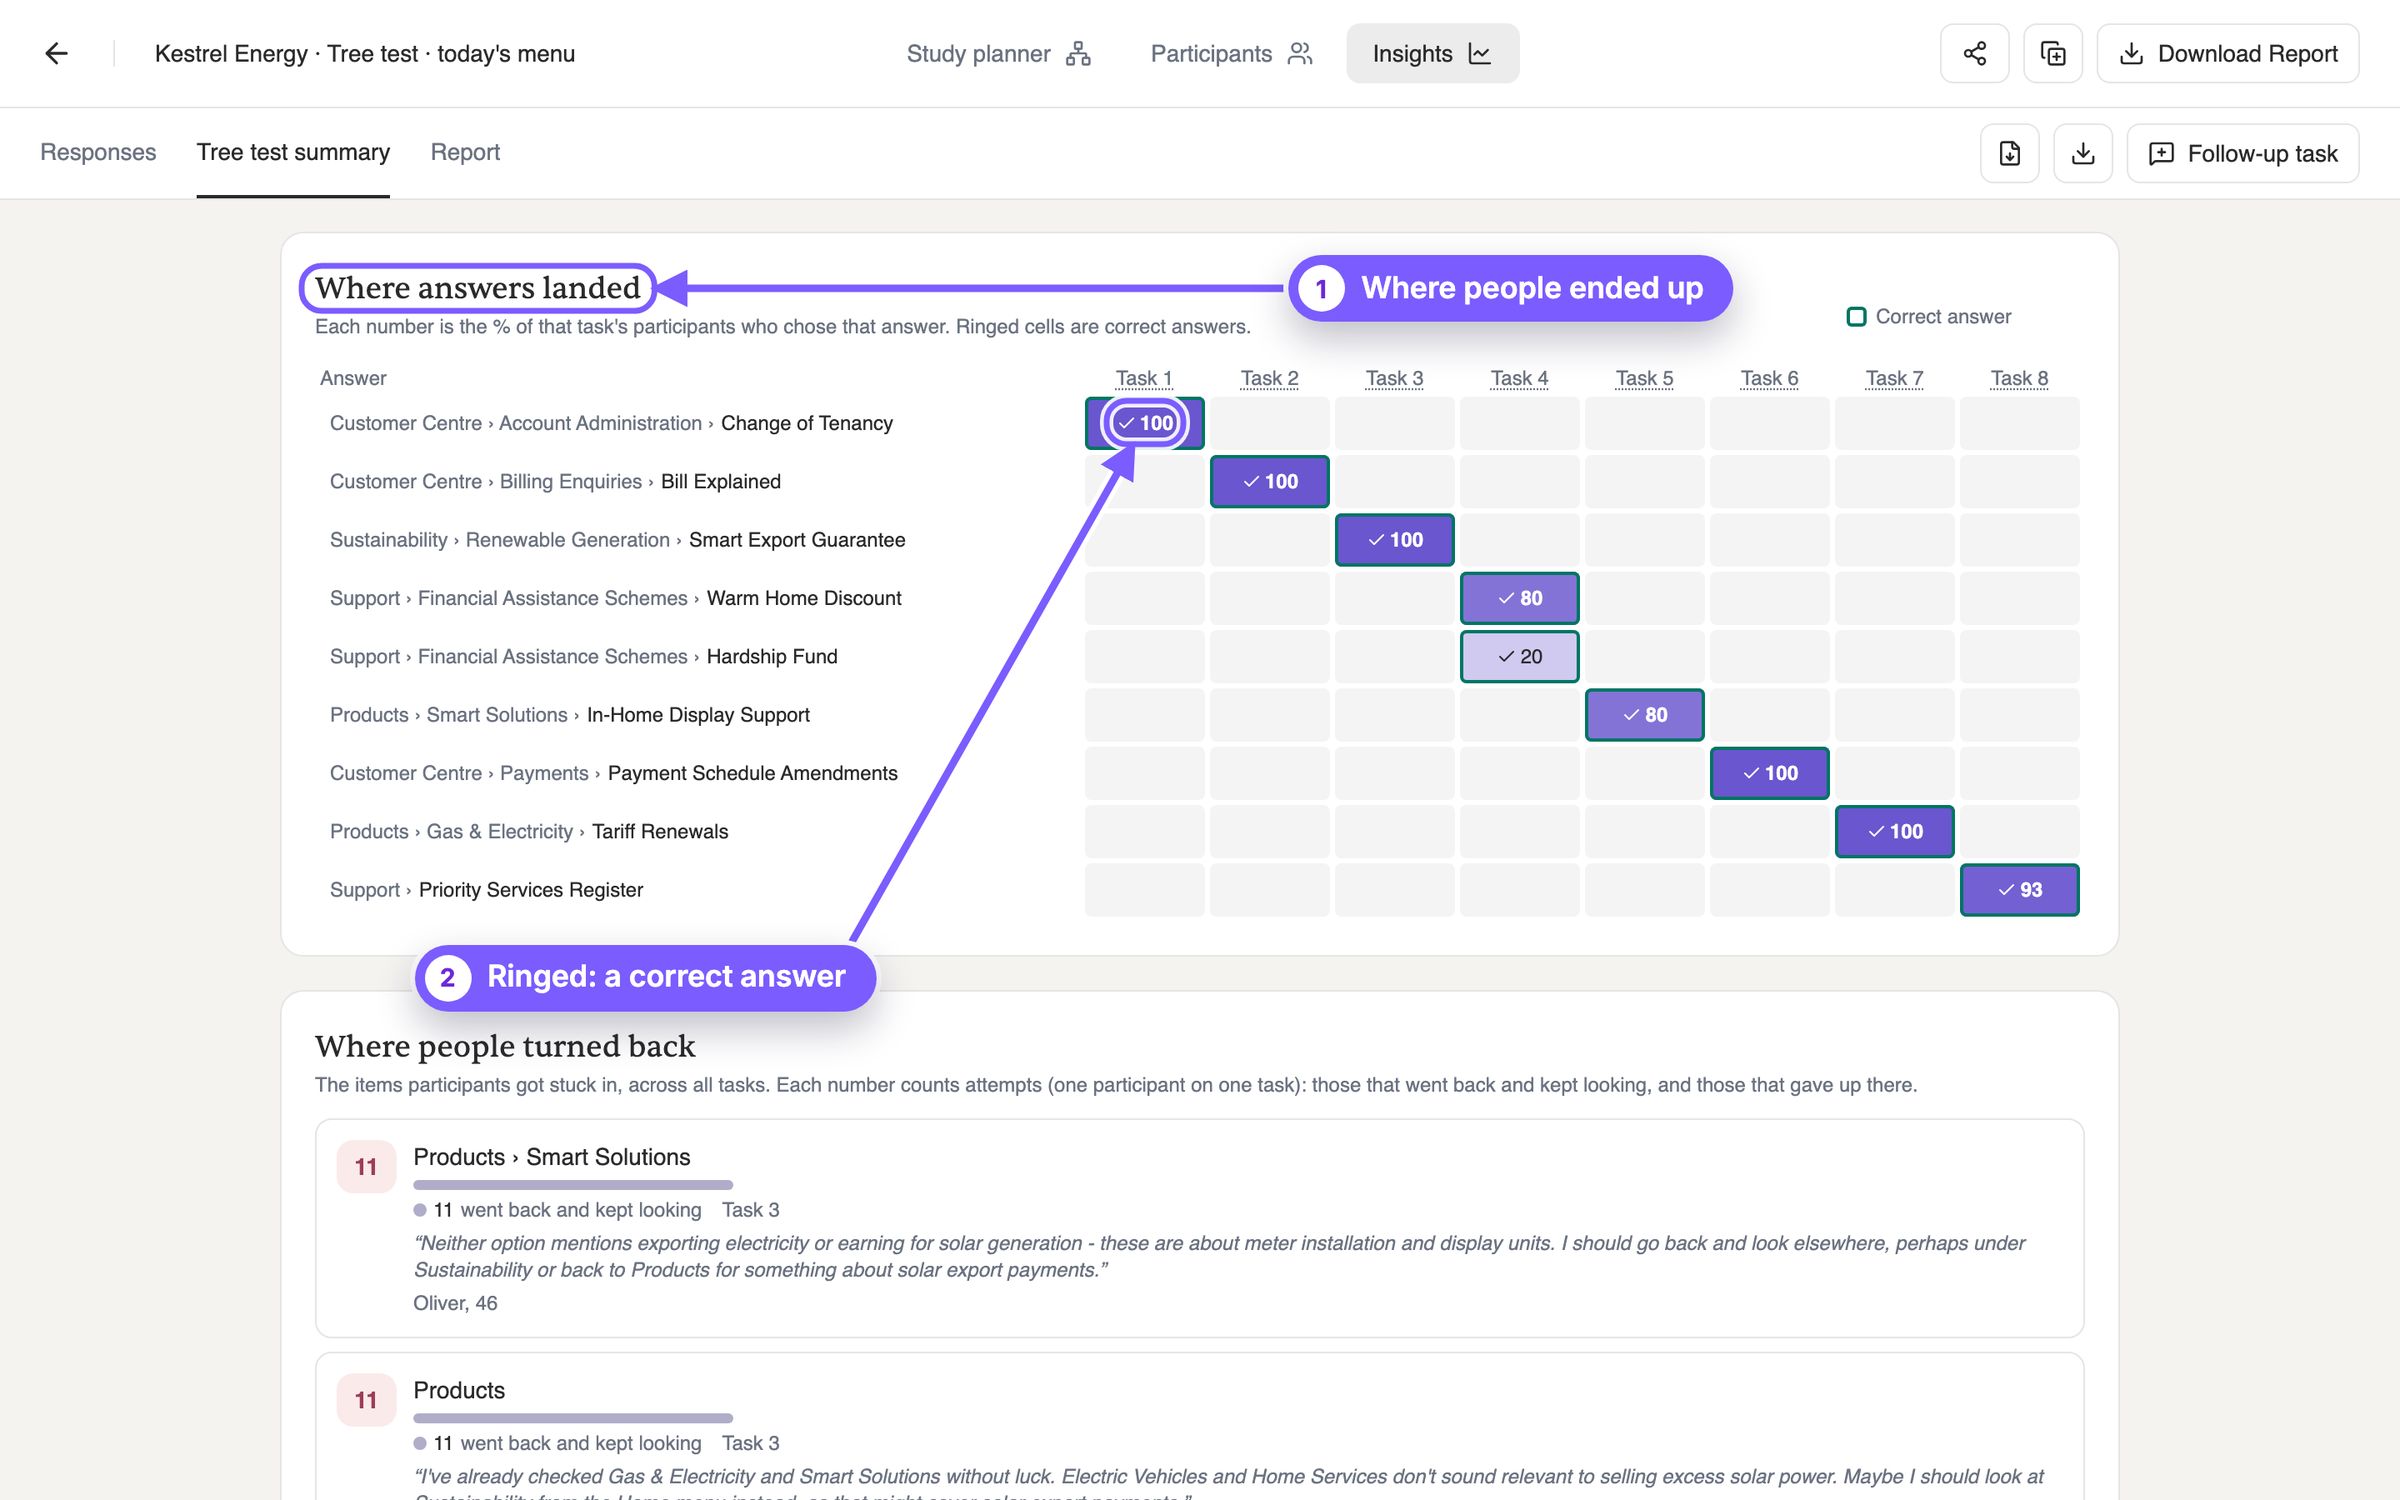
- 1Where people ended up. Where answers landed: for each task, the share of its participants who chose each answer, one column per task.
- 2Ringed: a correct answer. Ringed cells are correct answers. A large share outside a ring is a wrong place many people agree on: either a label to fix, or an answer you should also count as correct.
Where people turned back
The sections people opened and then left, across all tasks, with what they said. A section near the top of this list promises something it doesn't hold.
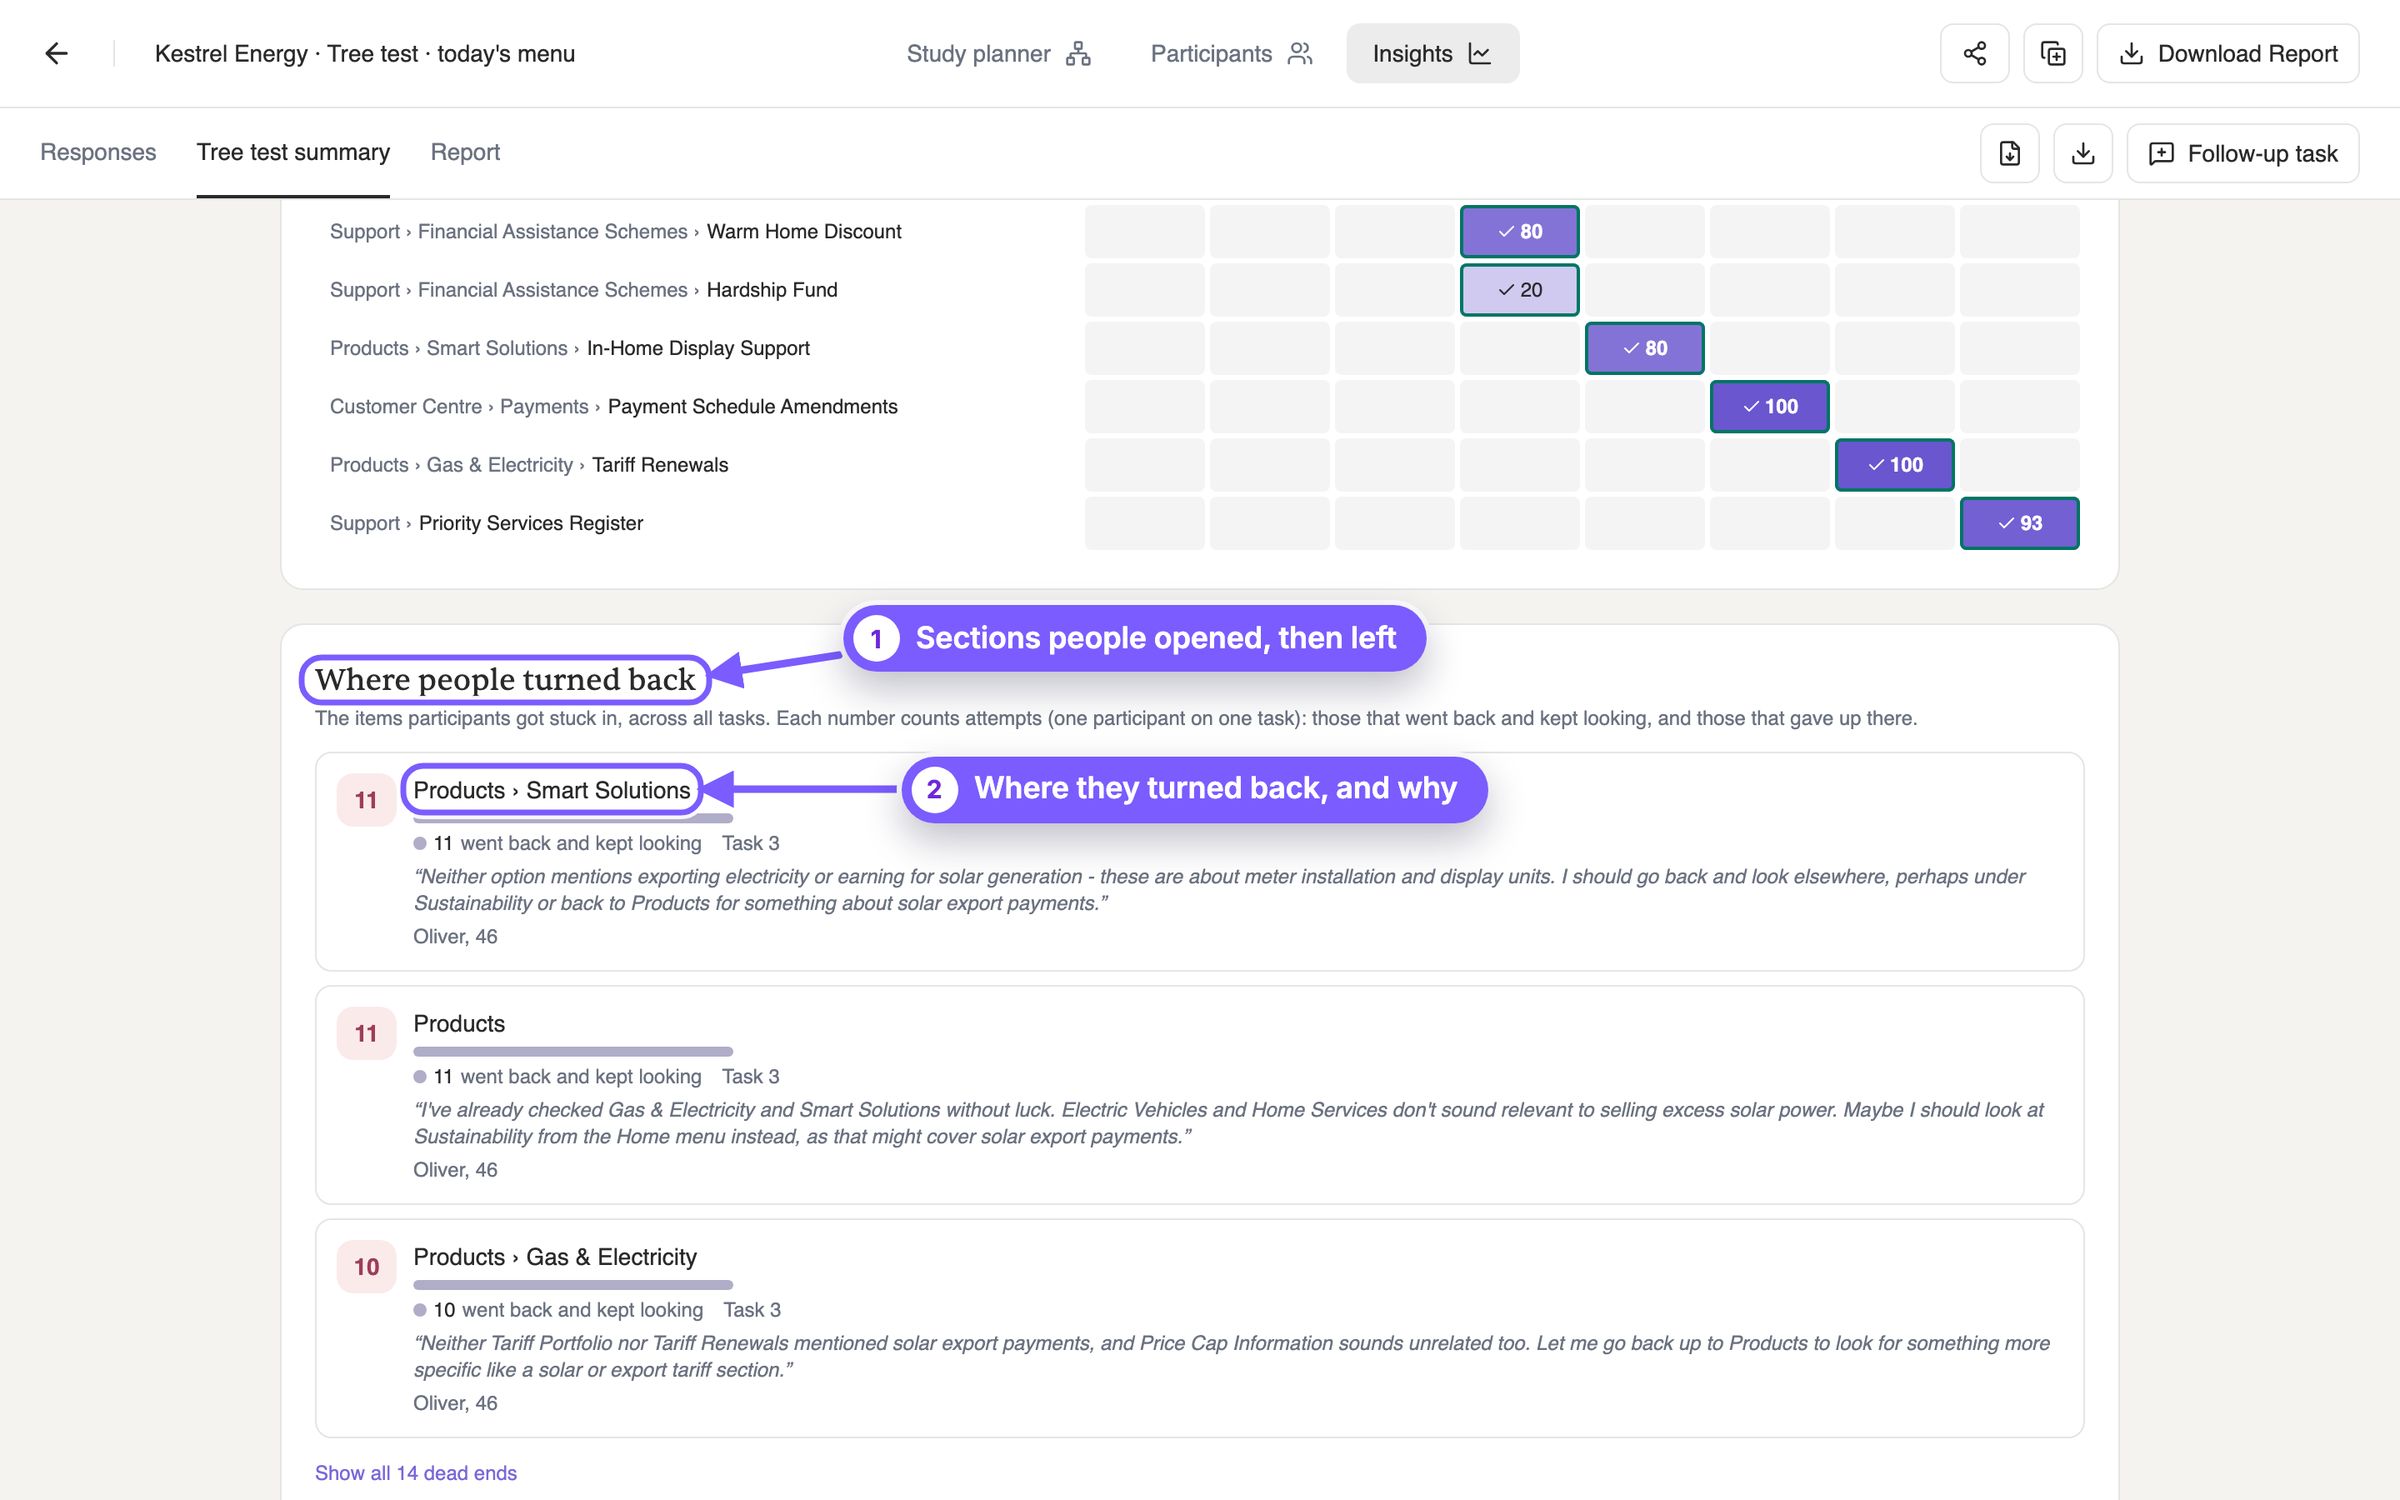
- 1Sections people opened, then left. Every place where participants got stuck, across all tasks, most first. Each count is attempts: those that went back and kept looking, and those that gave up there.
- 2Where they turned back, and why. The section, the task, and, under the count, a participant explaining why they went in. The top of this list is where a label promises something it doesn't hold.
By task
One task at a time: its scores, its effort, how the attempts ended with average confidence and ease, where people clicked first and where they ended up. If people chose a reasonable answer you hadn't marked, Count as correct re-scores every attempt.
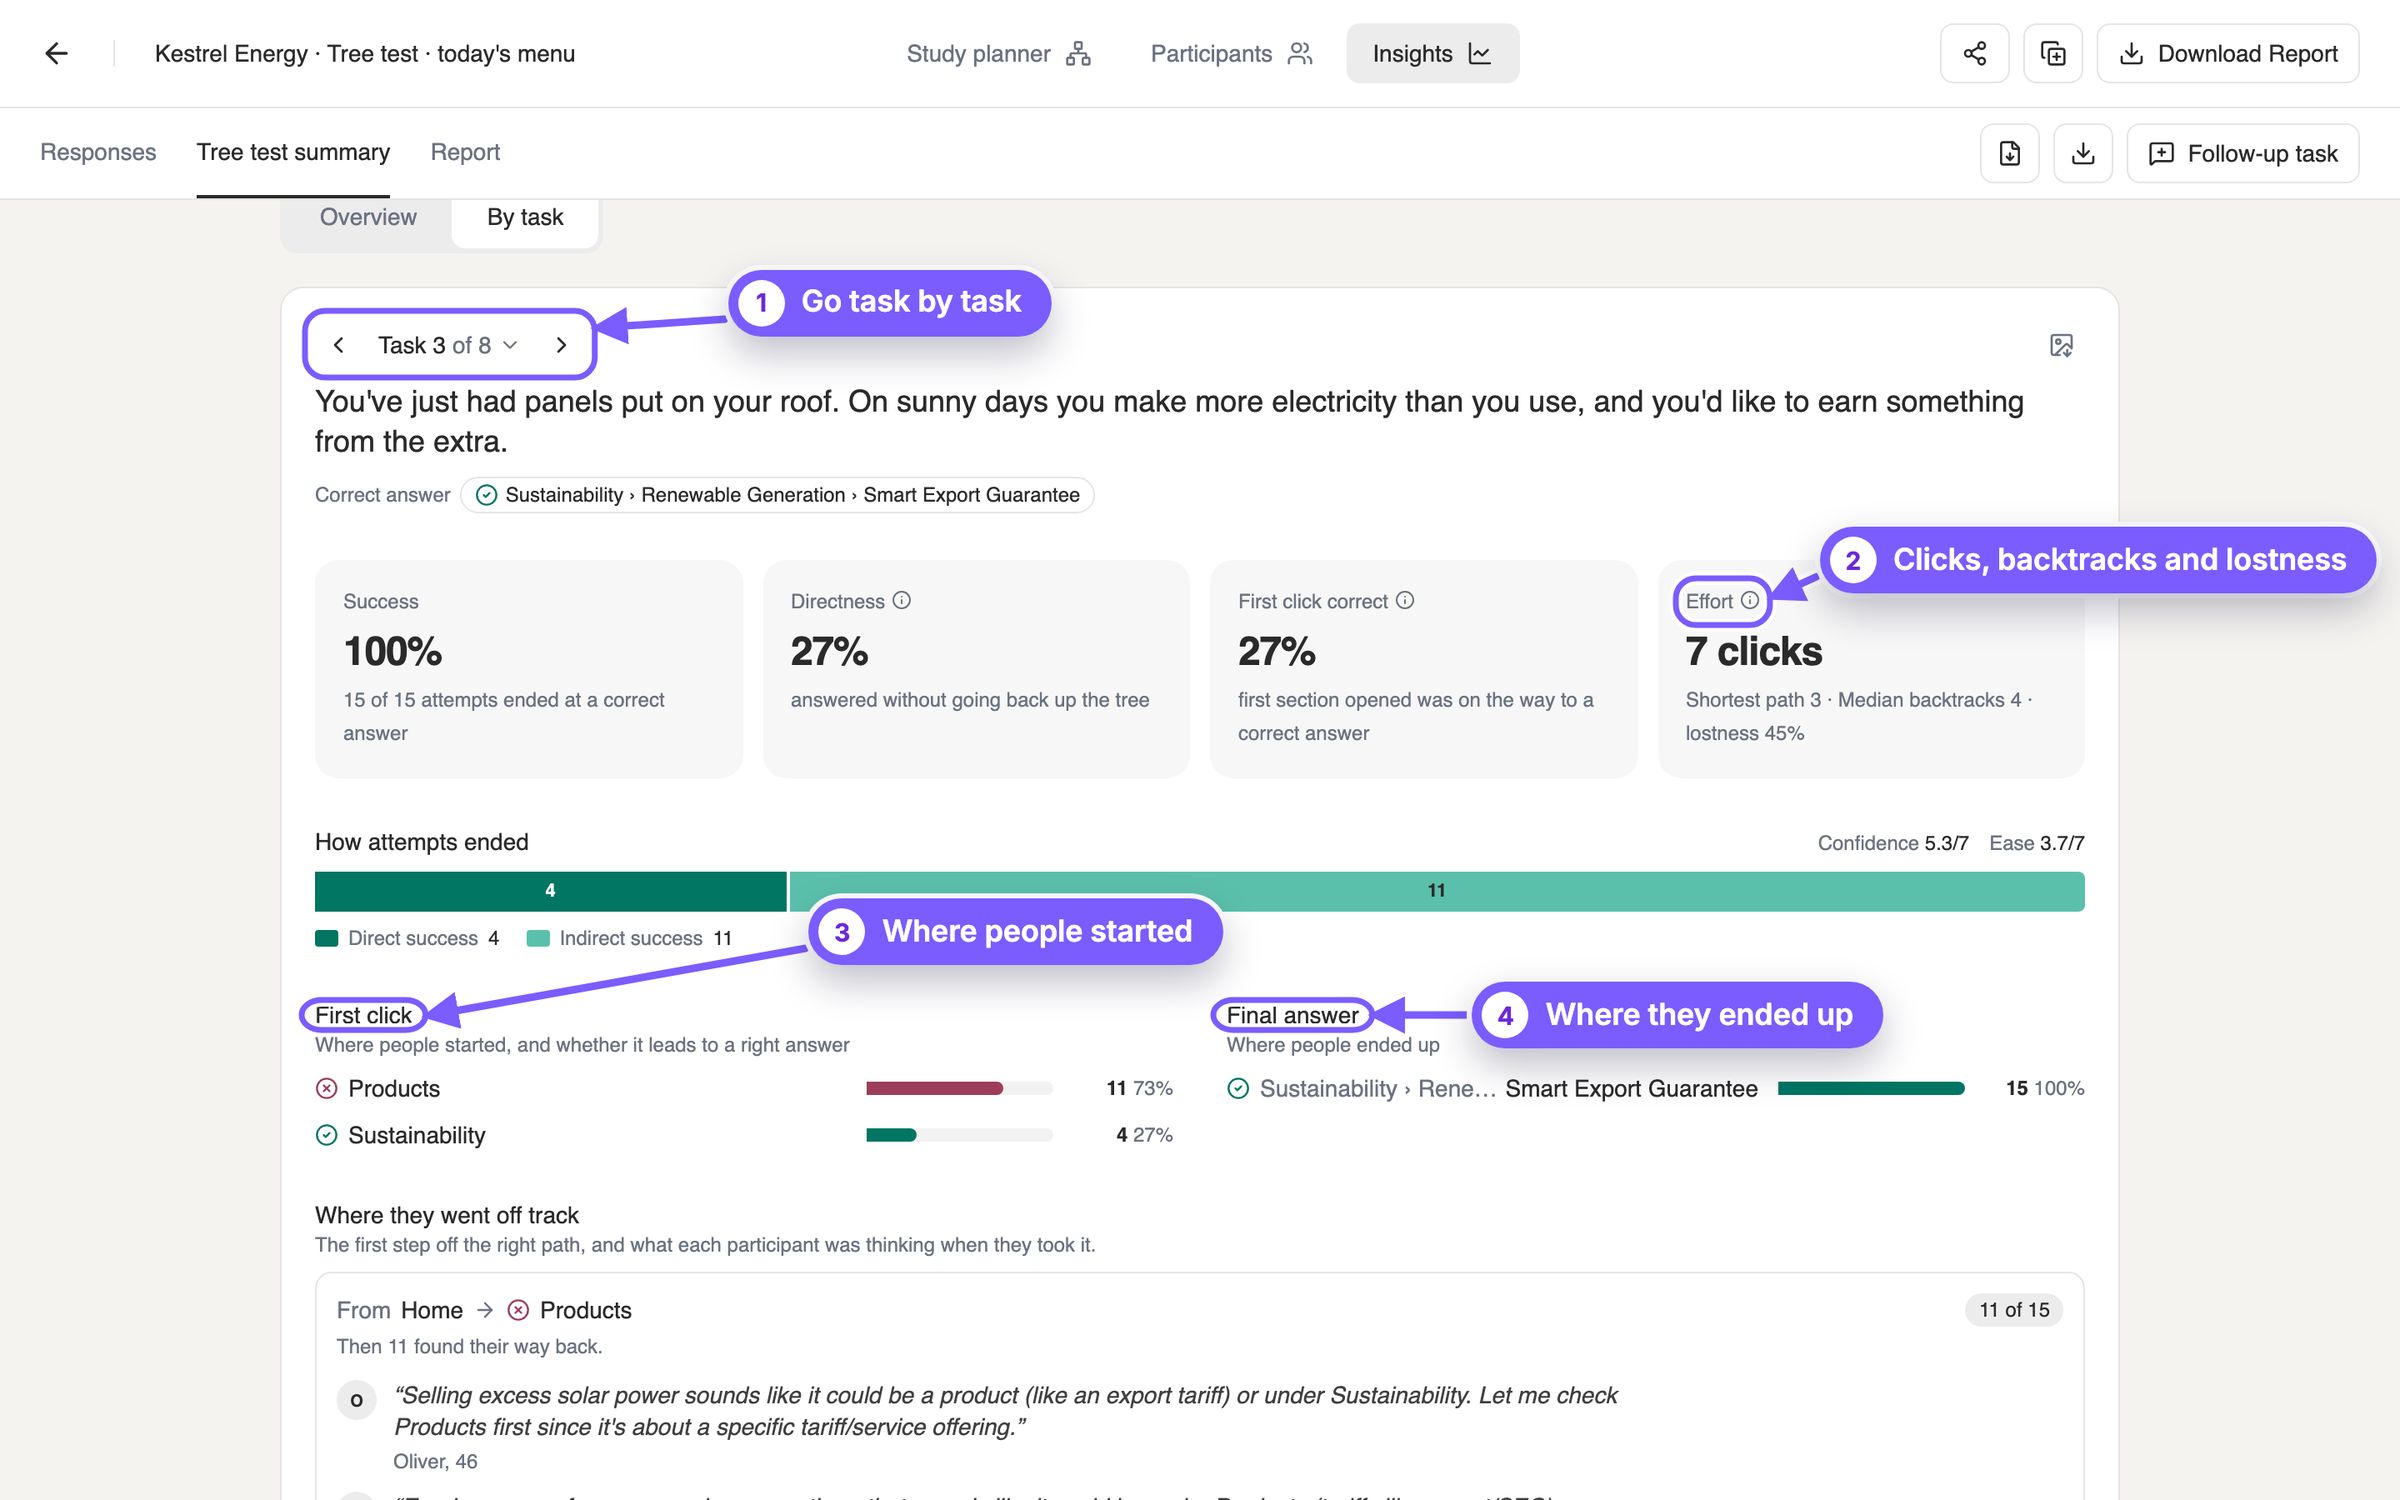
- 1Go task by task. Step through the tasks with the arrows, or pick one from the list. The task and its correct answer sit right below.
- 2Clicks, backtracks and lostness. Effort. Clicks is the median number of items opened, next to the shortest path, the fewest clicks a correct answer needs; backtracks is the median number of moves back up. Lostness compares each successful route with the shortest one: √((N ÷ S − 1)² + (R ÷ N − 1)²), where S is every item visited counting repeats, N the distinct items visited and R the items on the shortest route. Zero is a perfect route; the higher, the more people wandered. The task shows the average.
- 3Where people started. First click: where each attempt went first, and whether that leads to a right answer. A wrong first click shared by many is the label to look at.
- 4Where they ended up. Final answer: where the attempts finished.
Where they went off track
The first wrong turn each participant took, with what they were thinking when they took it: the reason behind a low score. Below it, Path tree shows every route, Paths groups identical routes, and Follow one participant replays an attempt move by move.
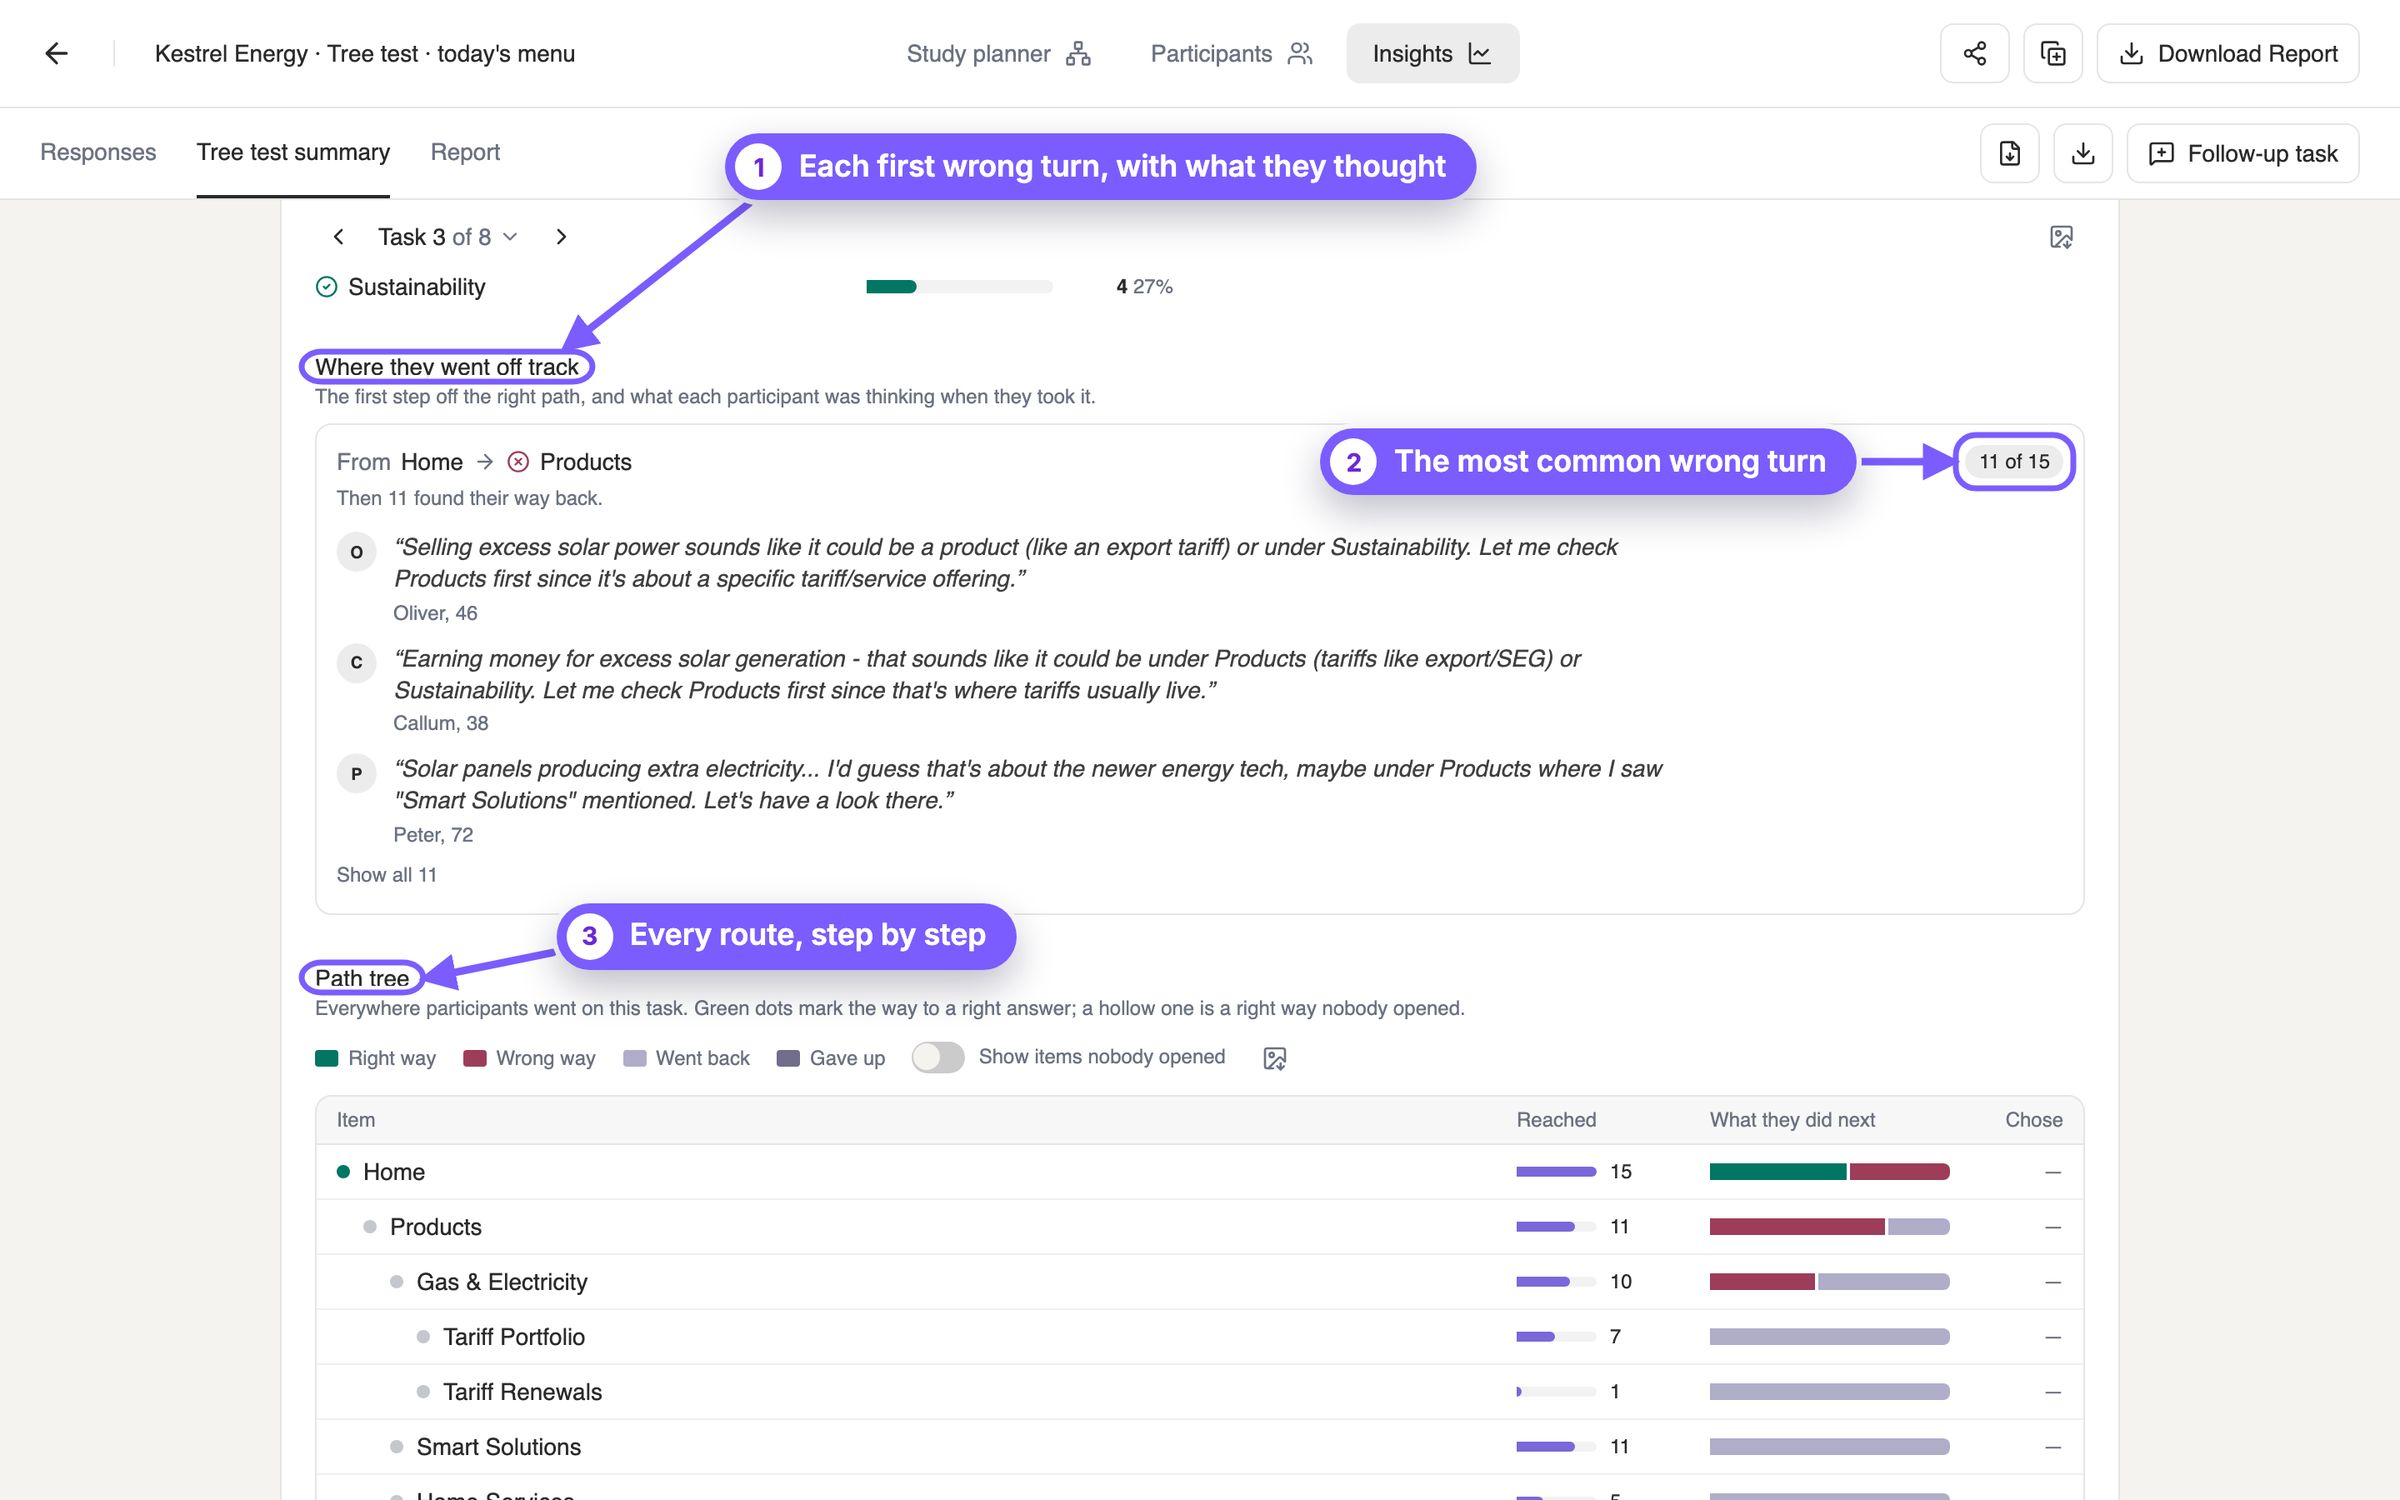
- 1Each first wrong turn, with what they thought. Each first step off the right path, how many took it, whether they found their way back, and what they were thinking, in their own words.
- 2The most common wrong turn. Listed first. Read the reasons: they tell you what people expected that section to hold, which is what to fix.
- 3Every route, step by step. Path tree shows every item people reached and what they did next: right way, wrong way, back or give up.
Tips and common mistakes
- Write tasks as situations. "You've got the keys to a new flat", not "Find Change of Tenancy". A task that repeats a label's words tests word matching, not your structure.
- One goal per task. Each task should have one thing to find, so its result has one reading.
- Mark every right place. If something lives in two places, tick both; otherwise a fair answer counts as a fail.
- Test what matters most. Pick tasks for your most important and most doubtful content rather than covering every item.
- Look at first clicks early. A wrong first click shared by many people usually means a top-level label to fix.
- Don't read success alone. Check directness and confidently wrong answers too: people who get there the long way, or who are sure of a wrong answer, are problems a success rate hides.
- Allow enough moves. Raise the limit for a deep or large tree, so skips mean people gave up, not that they ran out.
- Test the structure, not the screens. A tree test leaves out search, layout and visuals on purpose. To test the screens, run a User testing study.
Next steps
- Try a change. Follow-up task runs a task again with the participants who finished it, optionally with menu labels renamed, or adds a new task. It runs inside the same study and leaves earlier results as they are; to compare, switch Results for from Original test to the follow-up.
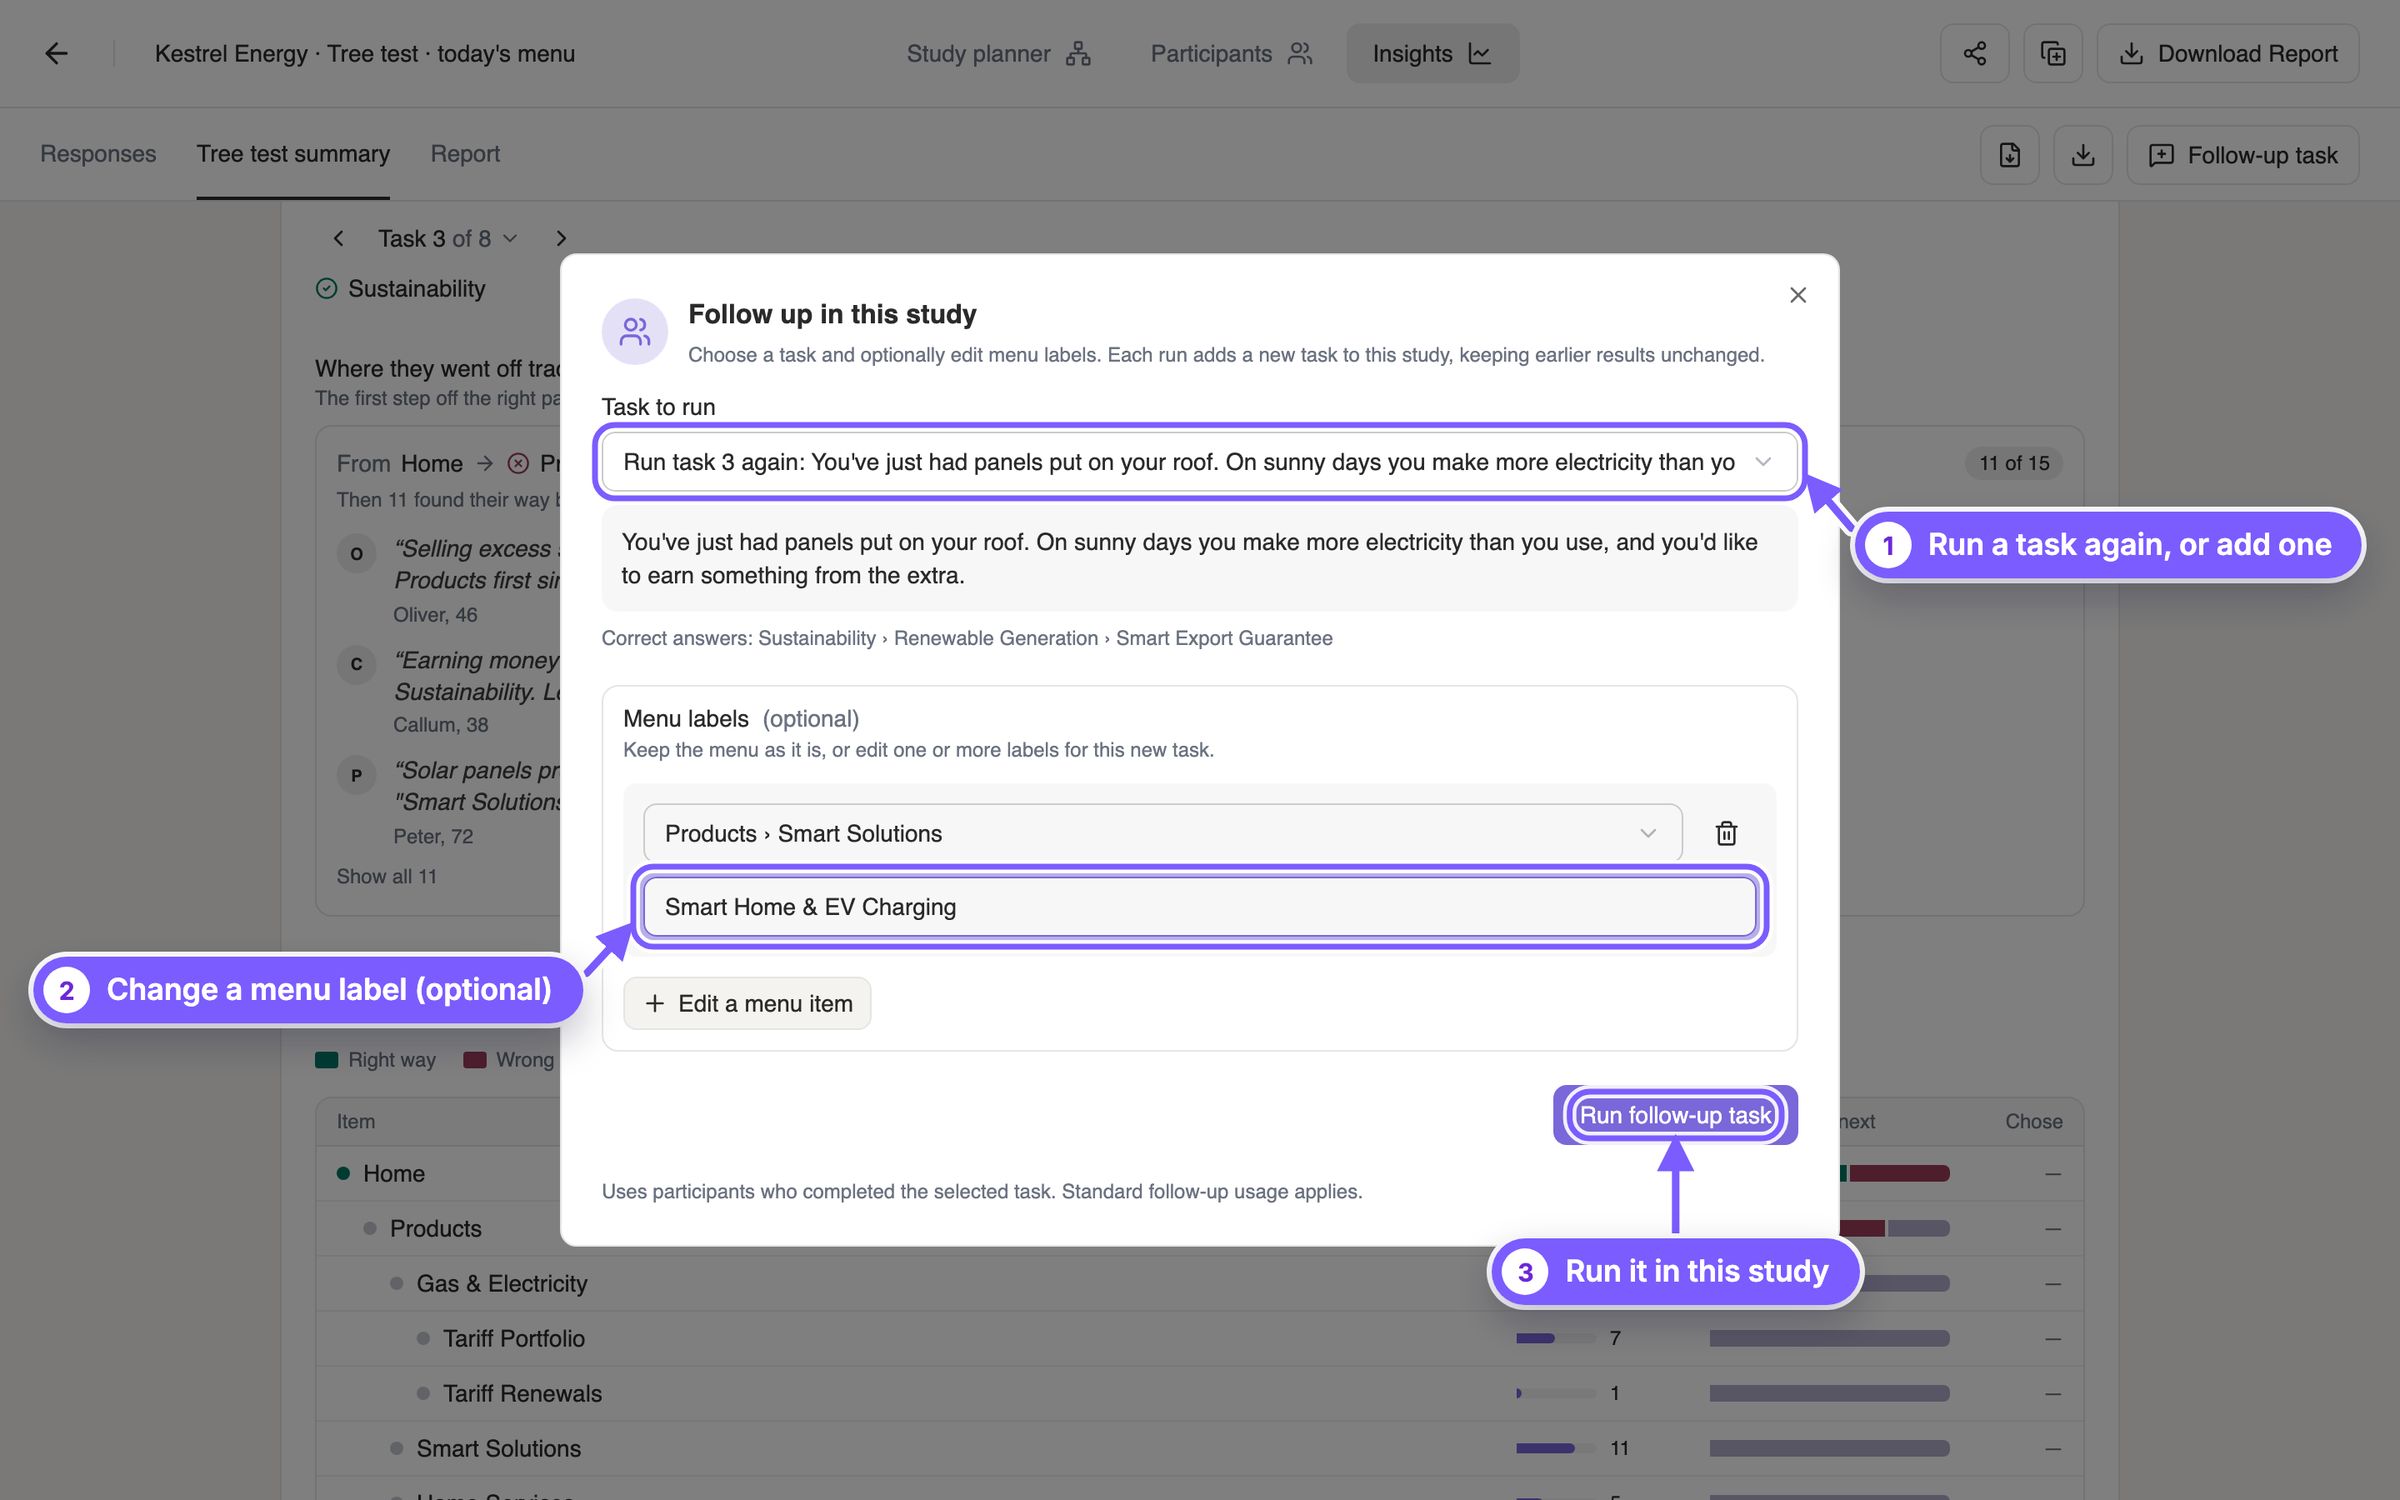
- 1Run a task again, or add one. Pick a task to run again with the participants who finished it, or Add a new task to ask something you didn't.
- 2Change a menu label (optional). Edit a menu item renames one or more items for this run only. The rest of the tree stays the same.
- 3Run it in this study. The run is added to this study as a new task; earlier results don't change. To compare, switch Results for from Original test to the follow-up.
- Share the results. Create a Report with the charts from your results and download it as a PDF or PowerPoint file. The raw results export as CSV from the summary tab.
- No structure yet? Start with a card sort to see how people group your content, then turn its Proposed IA into a tree test. See How to run a card sort.